Changelog
Follow up on the latest improvements and updates.
RSS
Exciting News: Introducing the New Messaging Feature on Mereka Connect! 💬
We're thrilled to announce the launch of our latest feature designed to strengthen the connection with your community on Mereka Connect. Now with messaging, initiating conversations about specific Experience or Space listings has never been easier. With just a few clicks, users can instantly start a chat with your Hub and delve into discussions that matter to them.
But that's not all! This messaging feature comes with a range of tools to enhance your communication experience. You can effortlessly manage conversations, assign specific chats to your team members, swiftly search through your chat history, and access different types of conversations sorted into multiple categories for your convenience.
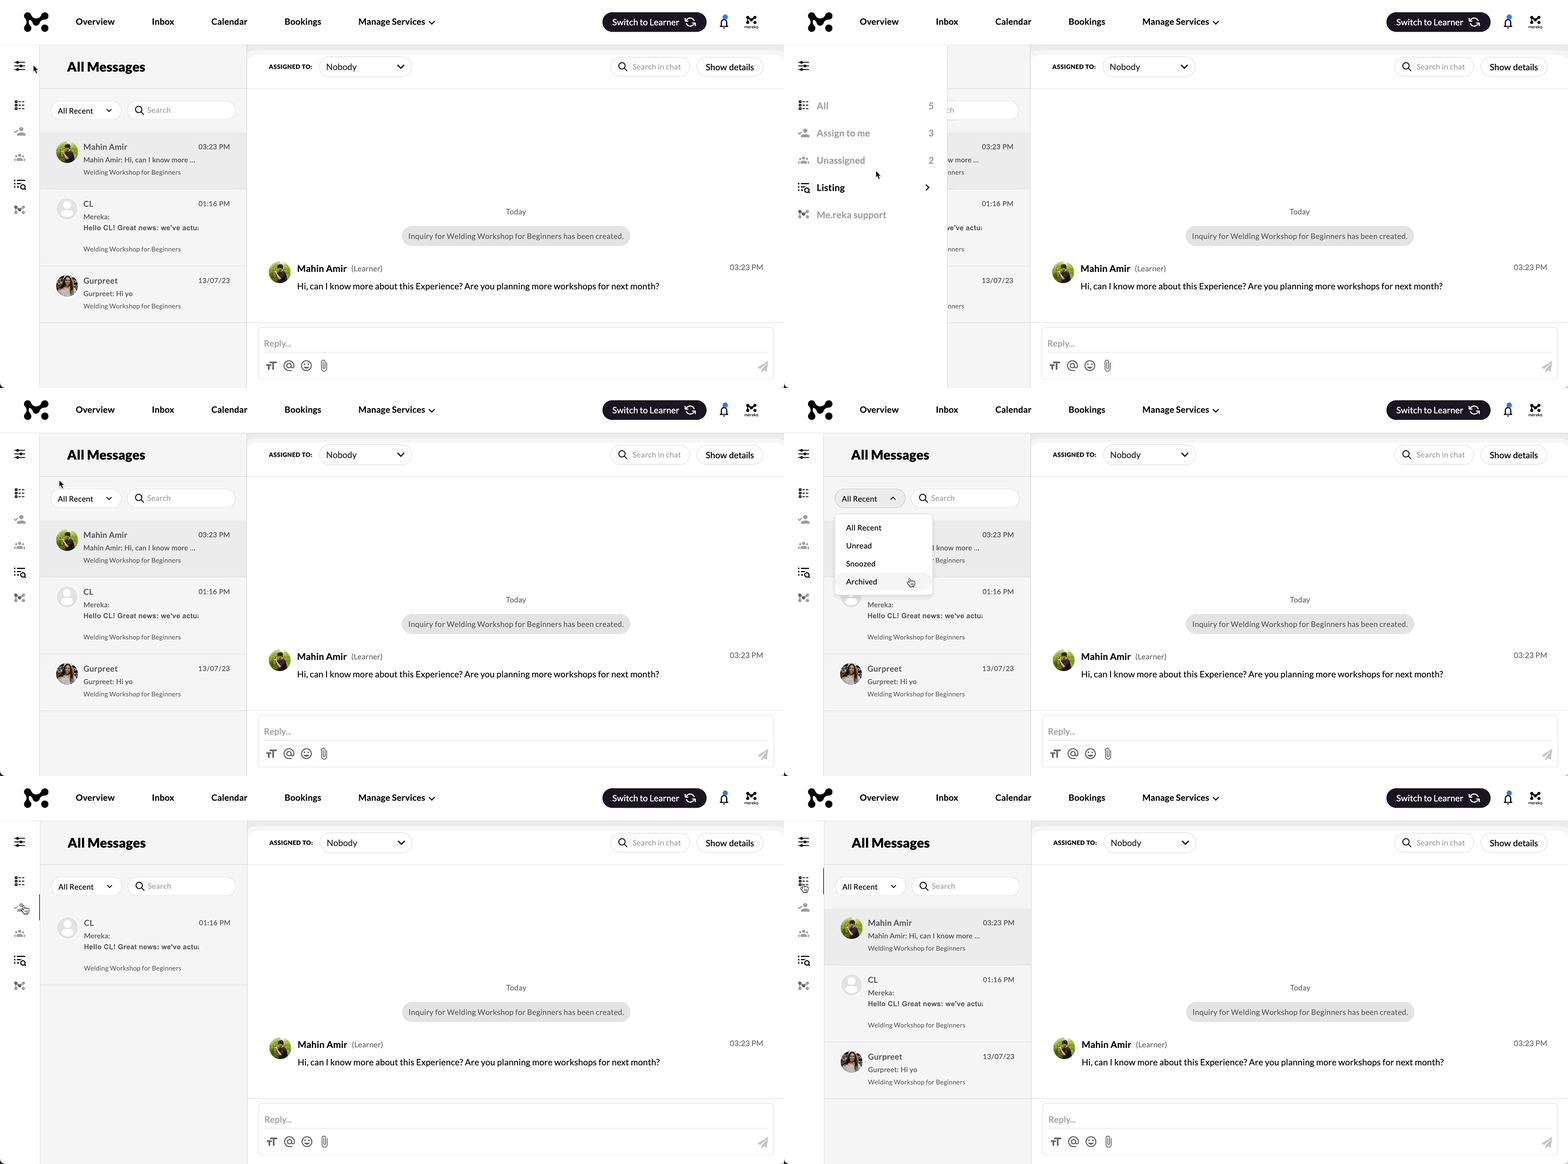
You can access your messages by clicking “Inbox” from the top bar of your Hub dashboard. On the left side of your inbox, you'll find categories for your conversations, including all messages, messages assigned to you, unassigned messages, and messages sorted by the corresponding listing for which a query was made.
You can also sort conversations in each category by “All recent”, “Unread”, or “Archived” using the dropdown menu at the top of the conversation list sidebar. Additionally, the sorting feature is accompanied by a search function for finding any message from your conversations with the use of keywords!
The main messaging window is optimized for simple and easy communication consisting of 4 core features:
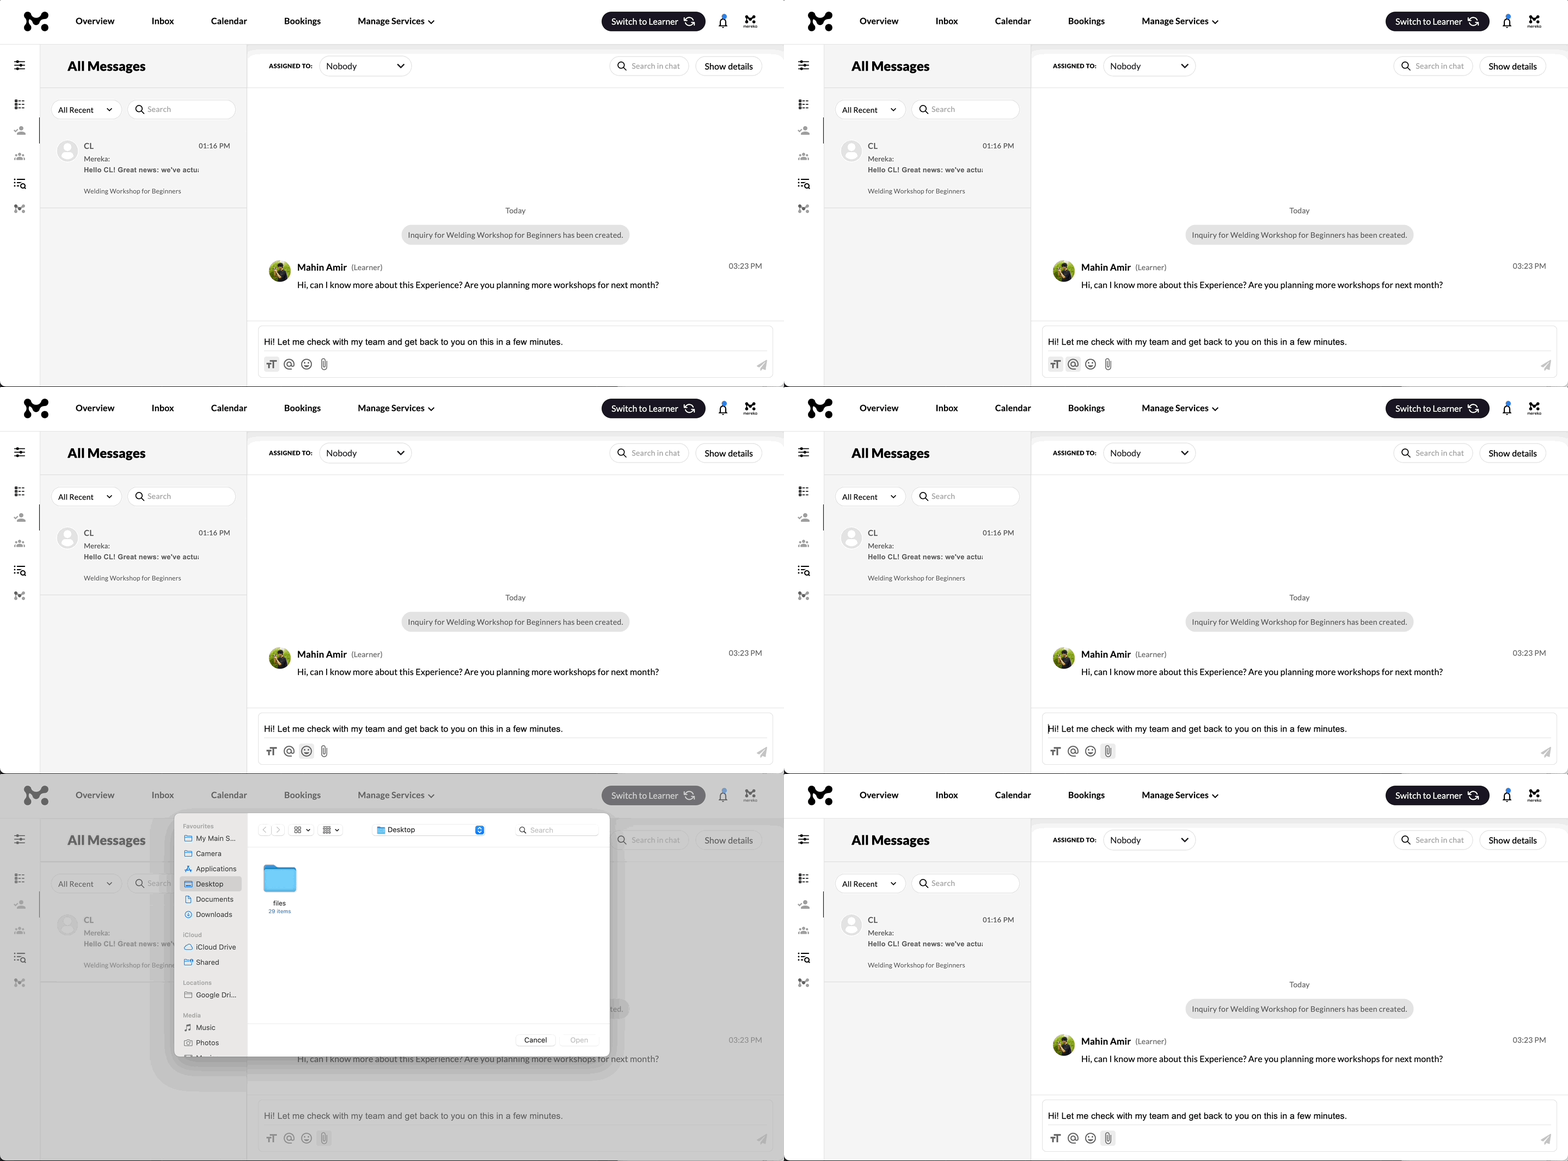
- Rich text editor:format your message text to be bold, italic, underlined, or strikethrough. You can also create hyperlinks as well as bulleted and numbered lists.
- Tag function:tag relevant accounts in your conversation for context or convenience.
- Emojis:conveniently add an emoji or two into your messages for a personal touch. Service with a (digital) smile!
- Attachments:directly share important resources with your community without the hassle of a separate email.
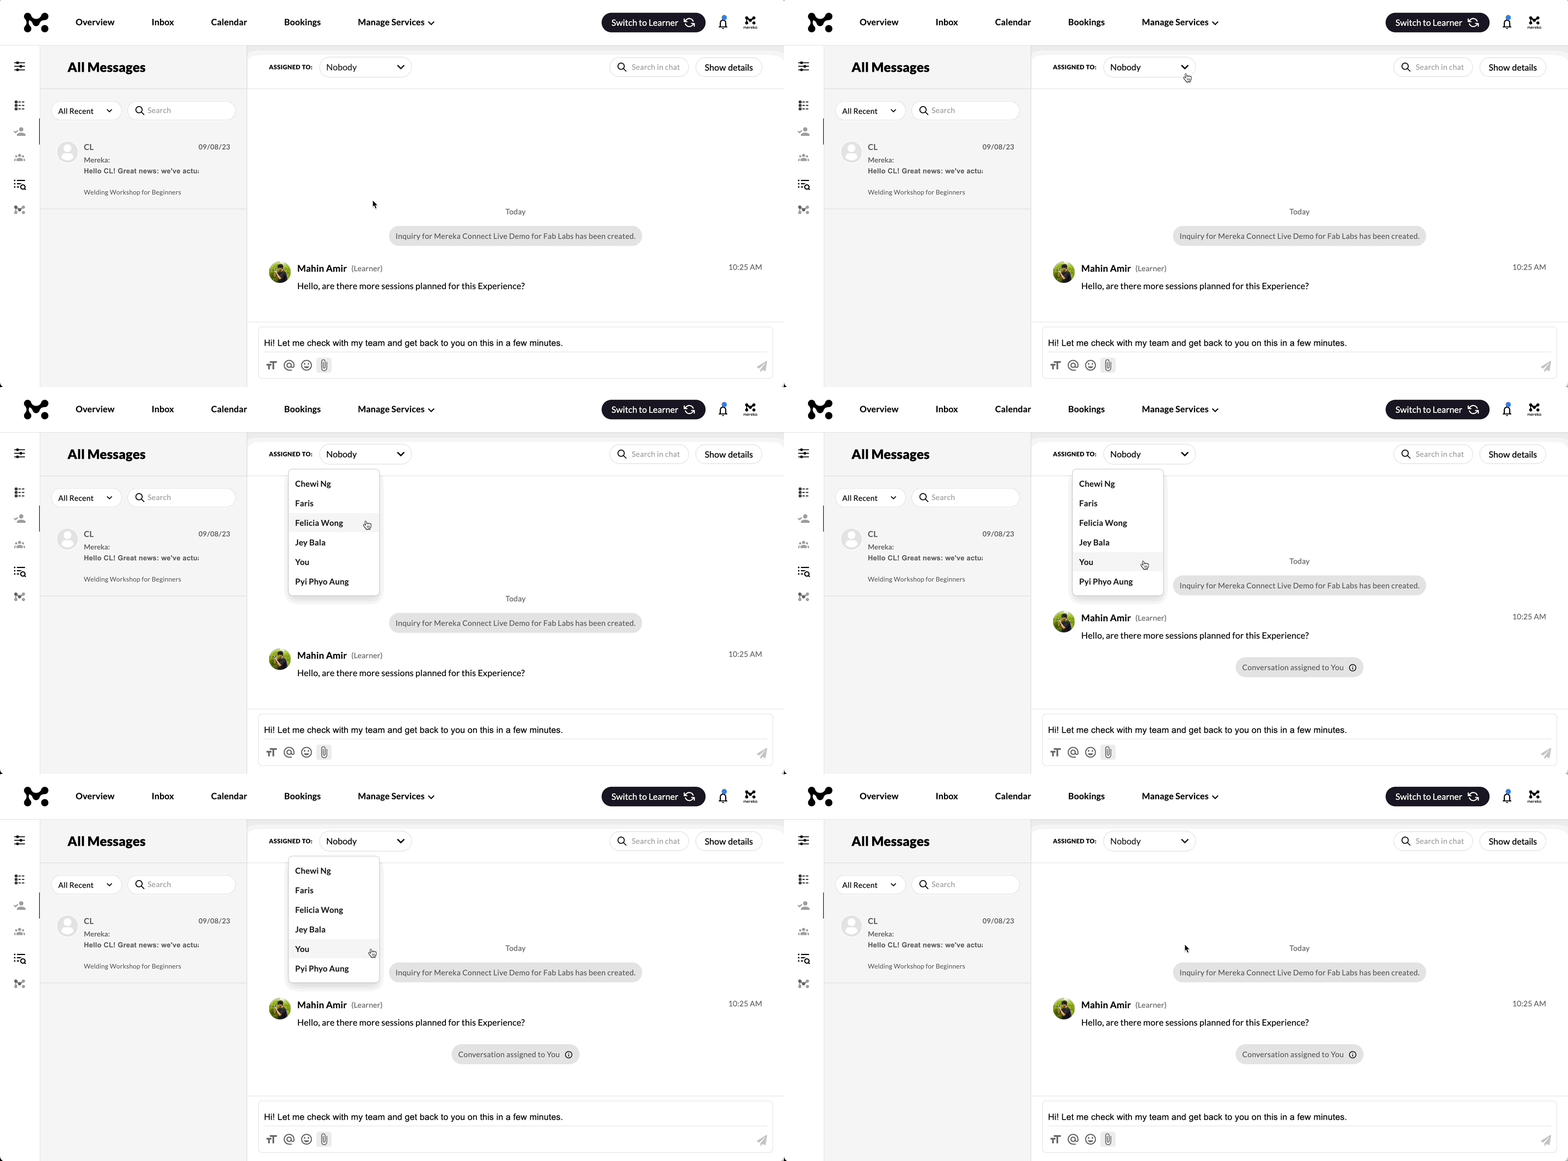
You can also assign team members to a specific chat by selecting their name from the dropdown menu at the top of the conversation.
The top bar of the conversation window also features a search function for easily locating certain messages by entering the relevant keywords, as well as a button to access conversation data such as the details of the user in the chat, listings enquired about by the user, attachments shared, and general settings to enable or disable notifications for the chat, archive it, or block the user.
Our vision for this feature is to create a new way to interact within Mereka Connect and stay connected, and we hope to see you in the chat! 💬
We’re thrilled to announce an exciting new feature that broadens the possibilities for what an Experience can be! Introducing: ticket types on Mereka Connect!
This feature offers versatility for Hubs to tailor their Experience to a range of different needs from Learners in the form of various ticket types. In this article, you will learn about the different ticket types you can offer for your Experiences, as well as how you can customize each type.
You may add, remove, and edit ticket types when listing a new Experience or editing an existing one.
There are 3 ticket types that you can offer for your Experience:
- Free:This ticket type is free of charge. This ticket type is only limited to one ticket per Experience.
- Paid:This ticket type is not free and can be charged at any amount specified by you. Bear in mind that your subscription plan determines the number of paid ticket types allowed per Experience!
- Private Group:This ticket type allows Learners to book your entire Experience, as long as the group size does not exceed the maximum ticket quantity. This ticket type is only limited to one ticket per Experience.
To add a new ticket, press the “Paid”, “Free”, or “Private Group” buttons at the bottom of the “Ticket Type” section.
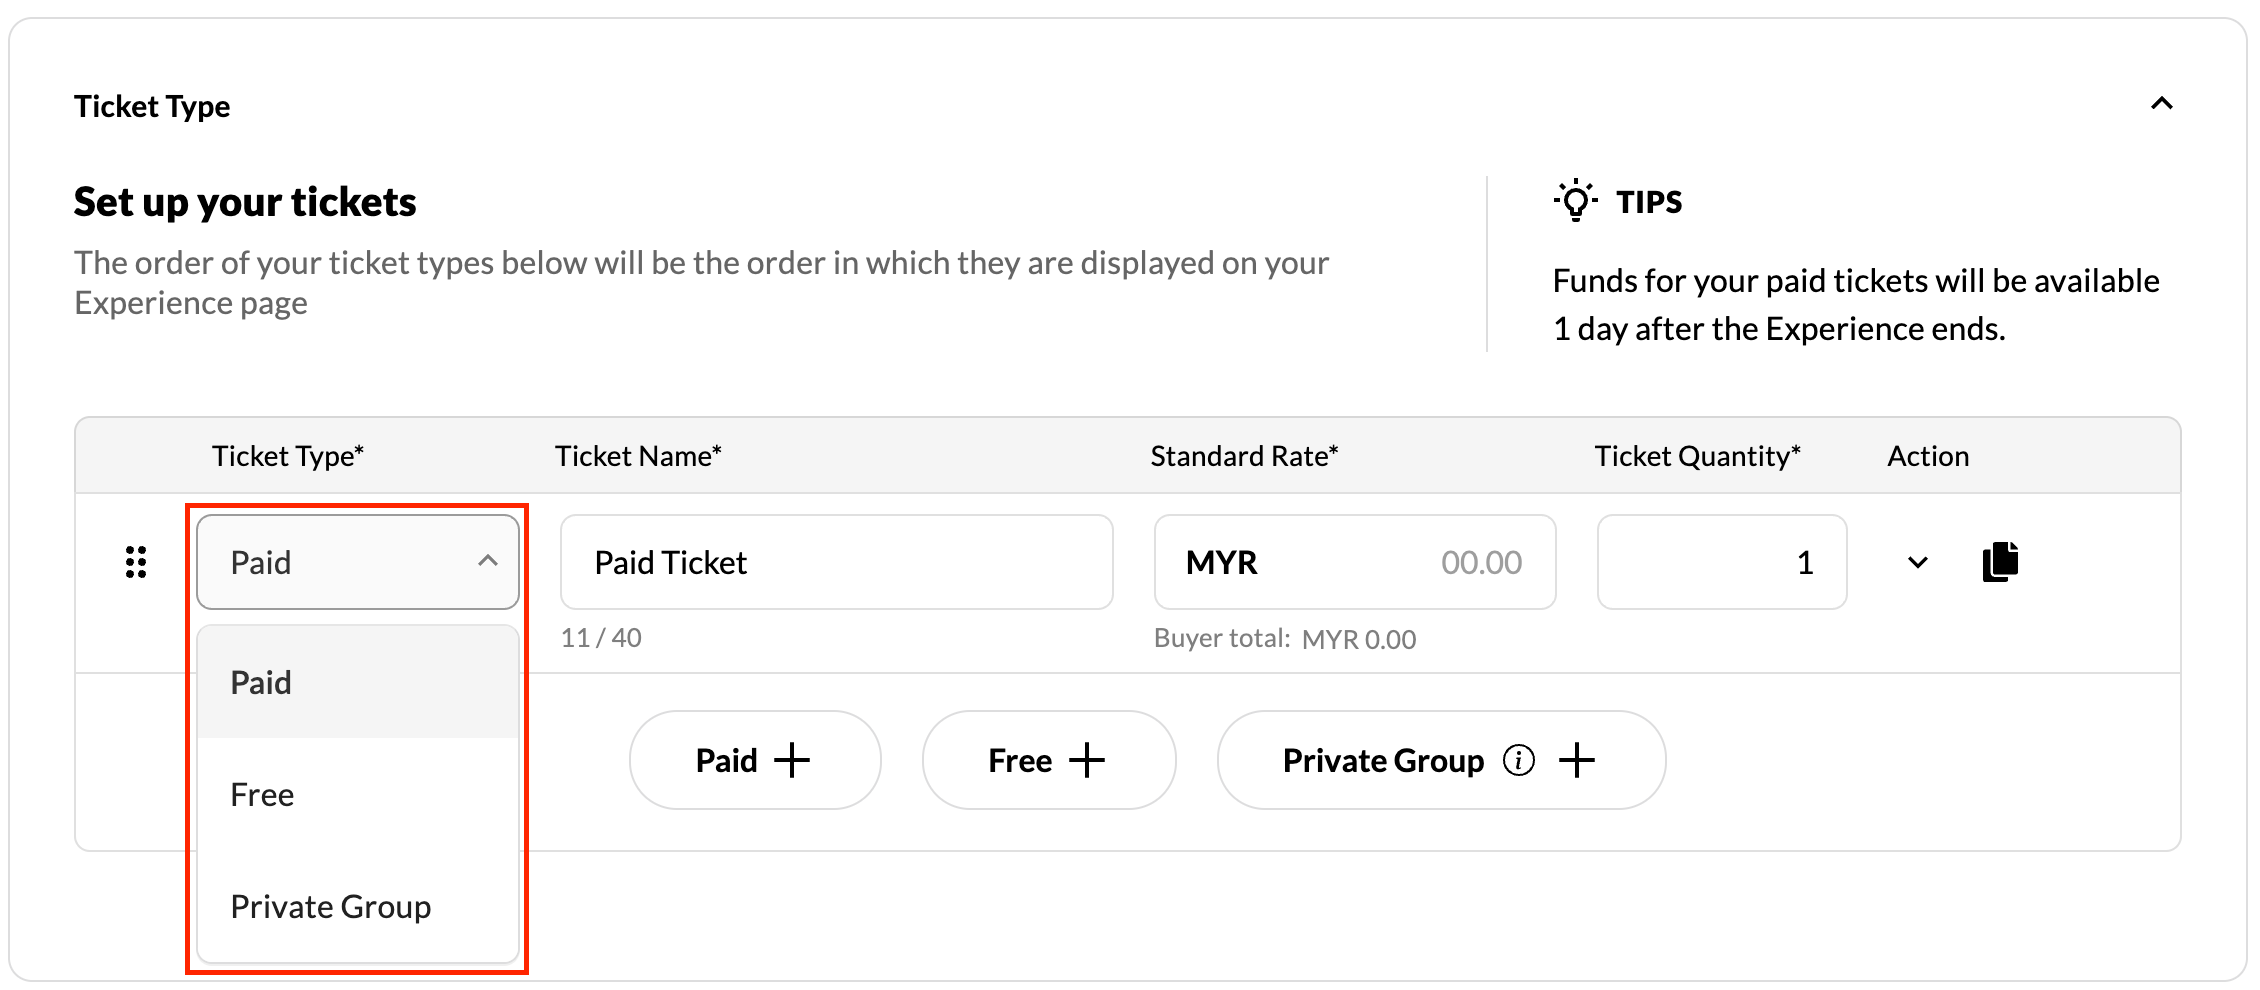
Each ticket type consists of several details:
- Ticket type:Choose between free, paid, and private group ticket types
- Ticket name:Write a name for your ticket (not more than 40 characters long)
- Standard rate:Set a specific price for your ticket.
- Max capacity:Set a number of tickets available for each ticket type
- Cutoff time:Set a time at which the ticket will become unavailable for booking. You can set a cutoff time of a certain number of hours, days, or weeks before your Experience starts.
- Description (optional):Tell Learners more about this ticket. You can include the services and features you are offering for the ticket here. The description should also be concise (not more than 200 characters long).
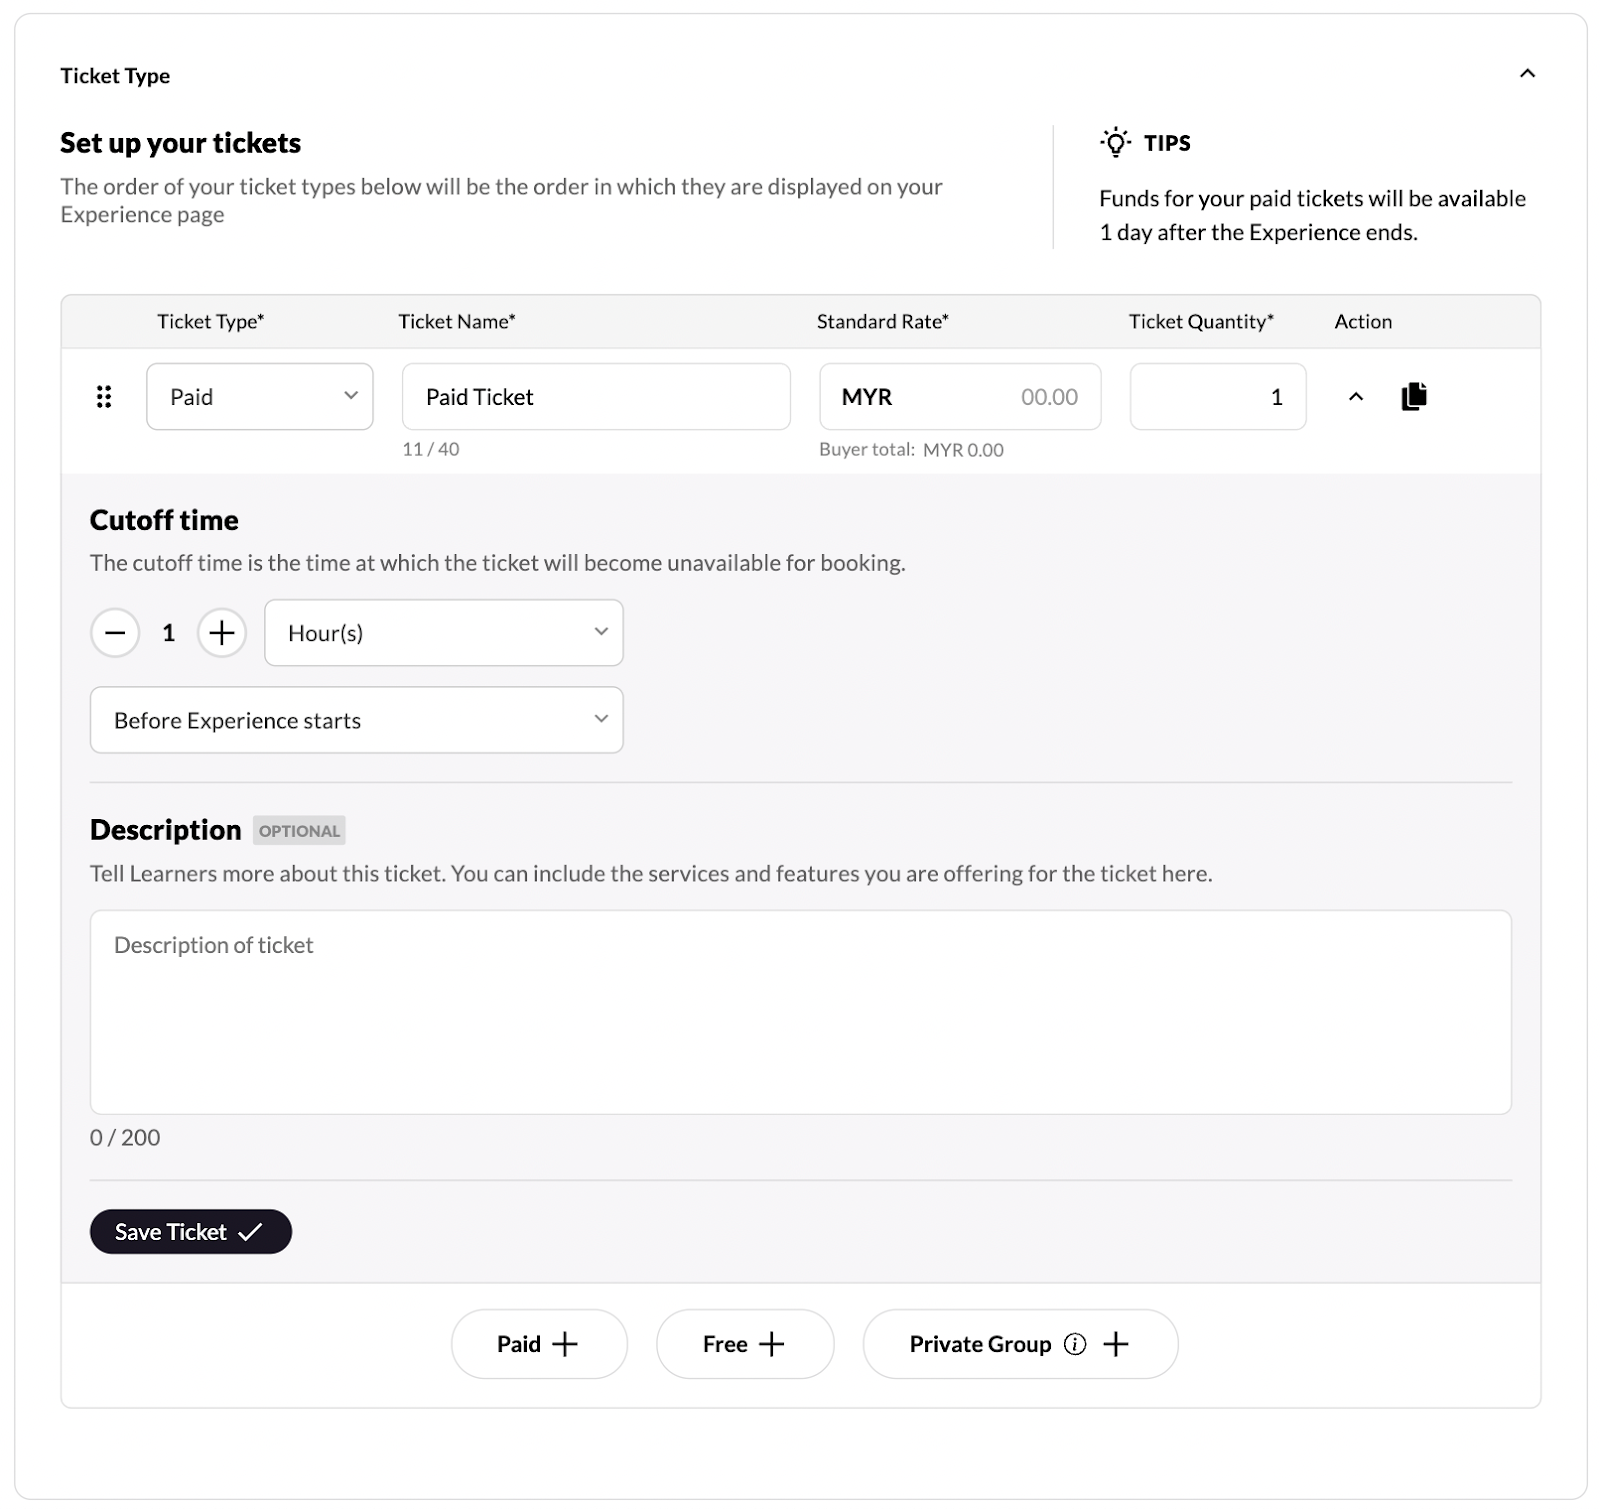
There are also several actions for setting up tickets:
- Press the downwards arrowto expand a ticket and edit its Cutoff time and description, and press theupwards arrowto collapse the expanded window.
- Press the copy iconto make a copy of a ticket. This button applies to paid tickets only.
- Click and drag the dotsto reposition your ticket.
- Press the "X" symbolto delete a ticket.
After filling all the relevant fields, press the “Save Ticket” button to confirm your ticket’s details and save it.
Ticket types are a great way to tailor what your Experiences offer in a variety of unique ways, such as Early Bird tickets, packages, bundles, and more!
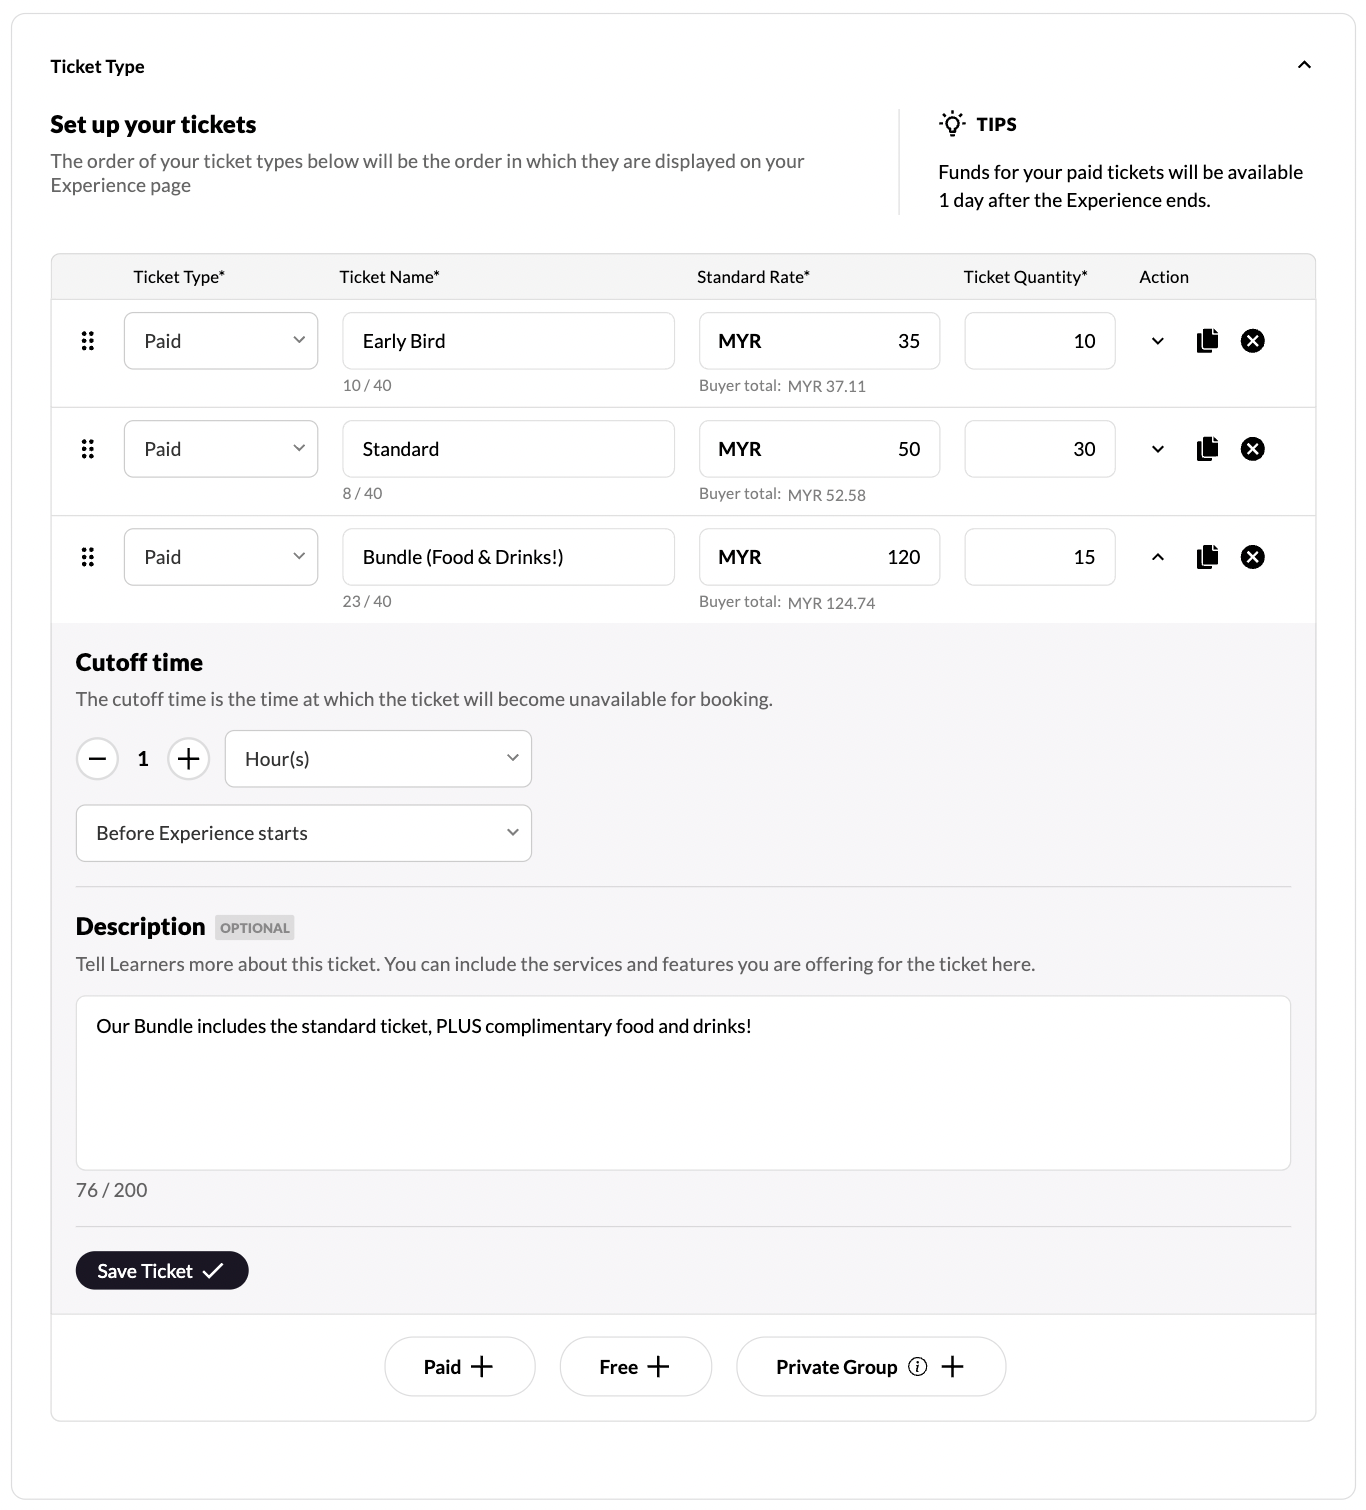
Will all ticket types apply to all time slots?
Yes. If you have 2 time slots, (following the example above) there would be 10 early bird tickets, 30 standard tickets and 15 bundle tickets available for each of your 2 slots - a total of 55 tickets available per slot.
That’s everything you need to know about the ticketing feature. We hope you find it useful and look forward to hearing your feedback!
Exciting news! The long awaited FPX payment method is here! 💸
We are excited to roll out the FPX & GrabPay feature on Mereka Connect. Now whenever your customers are at the checkout page of an Experience, they can choose between FPX, Card, GrabPay, or GooglePay as their payment method. And when checking out as a guest, they need only to key in their name, email, phone number, and press save before the payment method options appear.
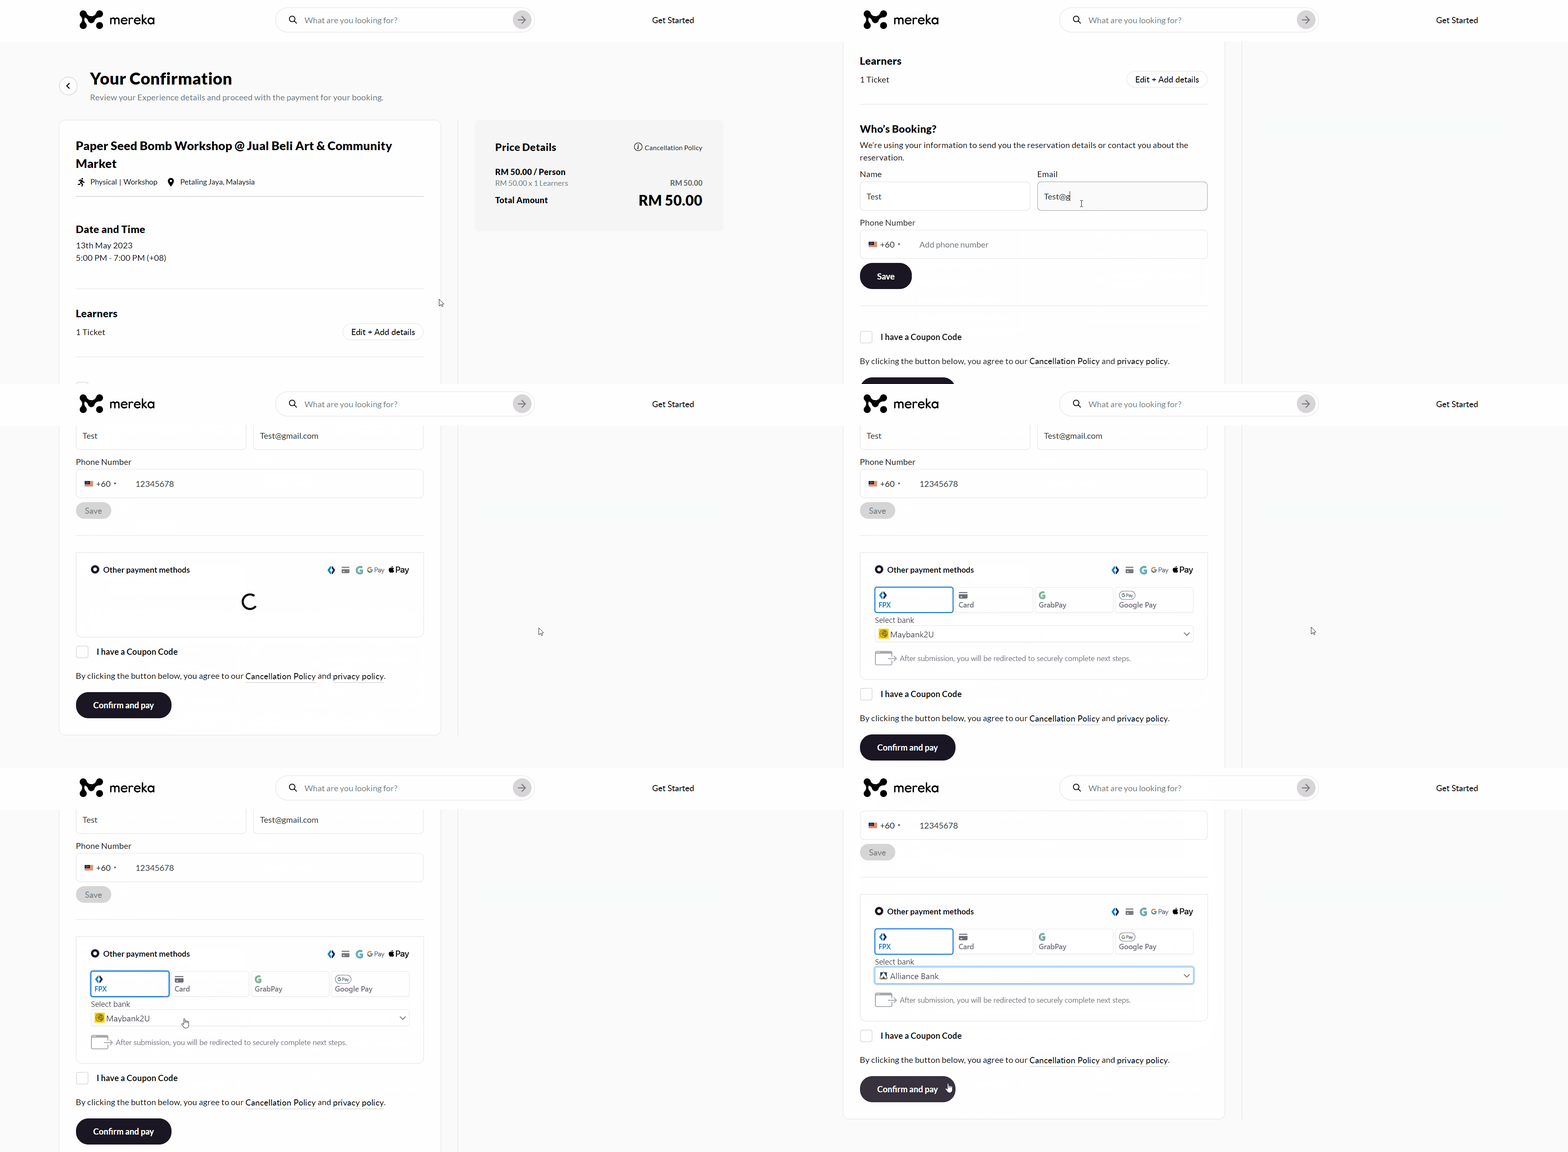
If they’re logged in to their profile, their saved card will be shown. They can switch to FPX or GrabPay by just clicking the ‘Other payment methods’ radio button and the section will expand.
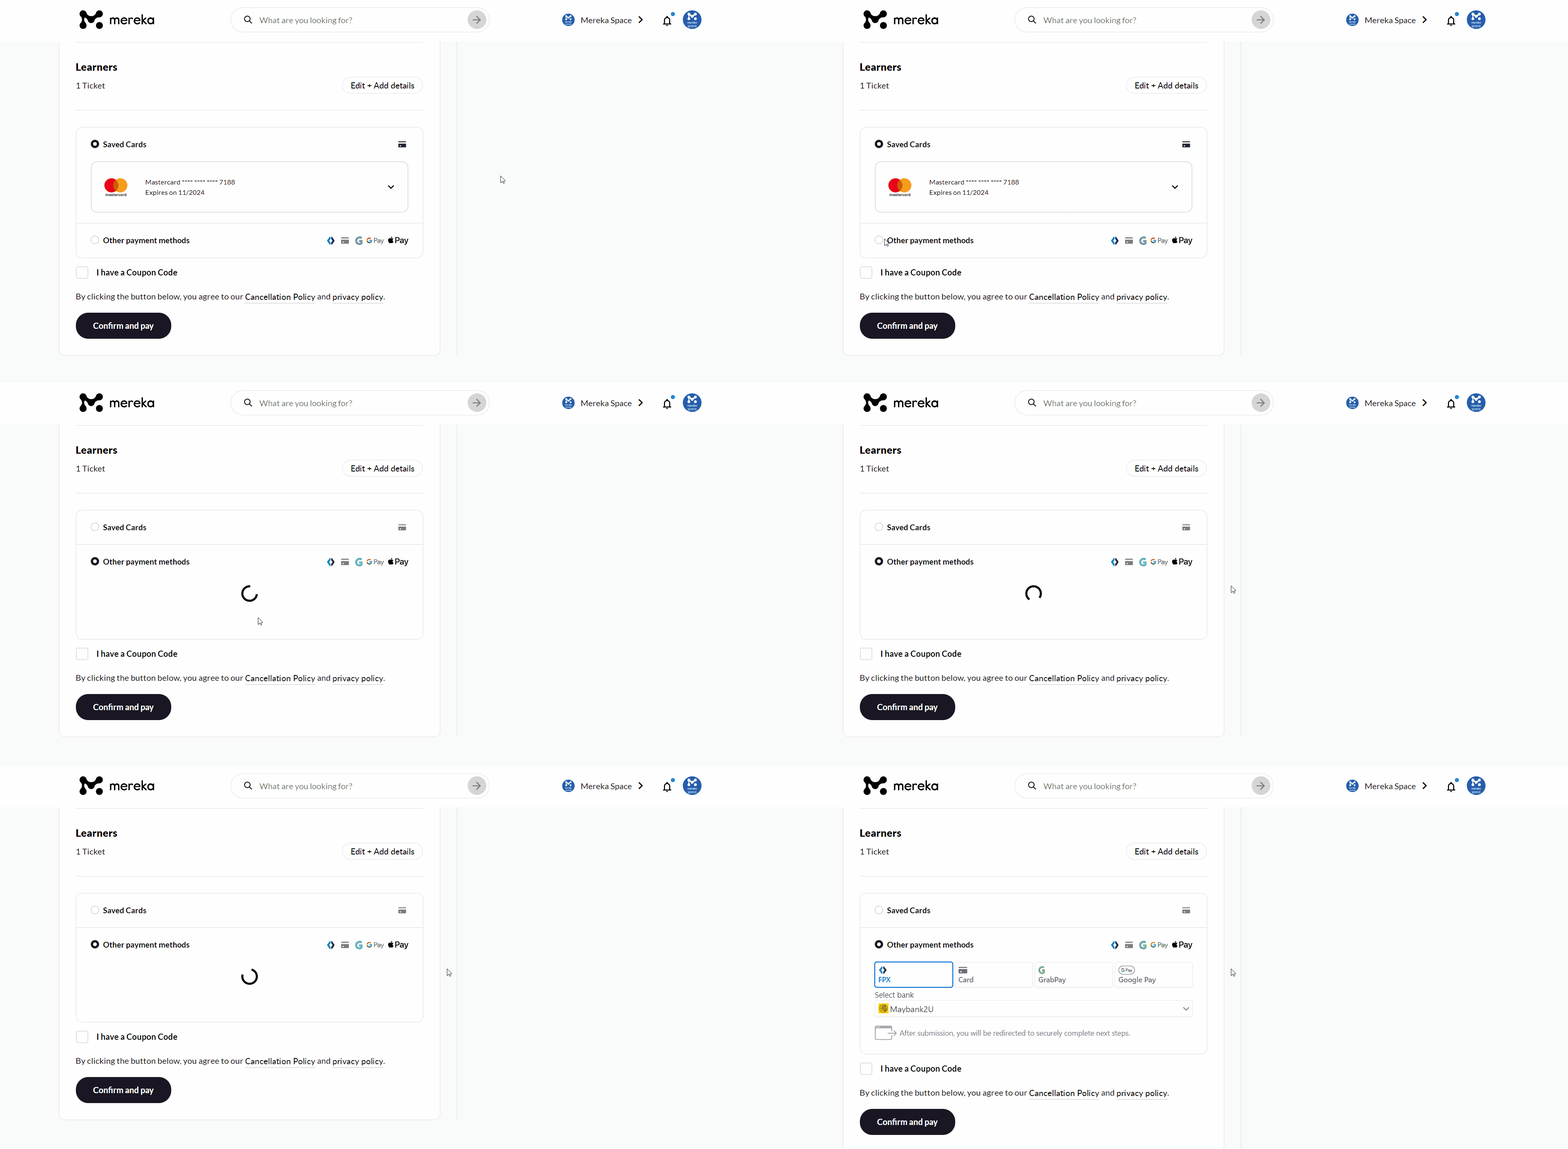
Clicking ‘Confirm and pay’ after selecting a bank will redirect them to their usual FPX bank page which we have all come to know and love ❤️
Once they have completed the FPX or GrabPay payment, they will then be redirected to the booking confirmation page where their booking details will be displayed.
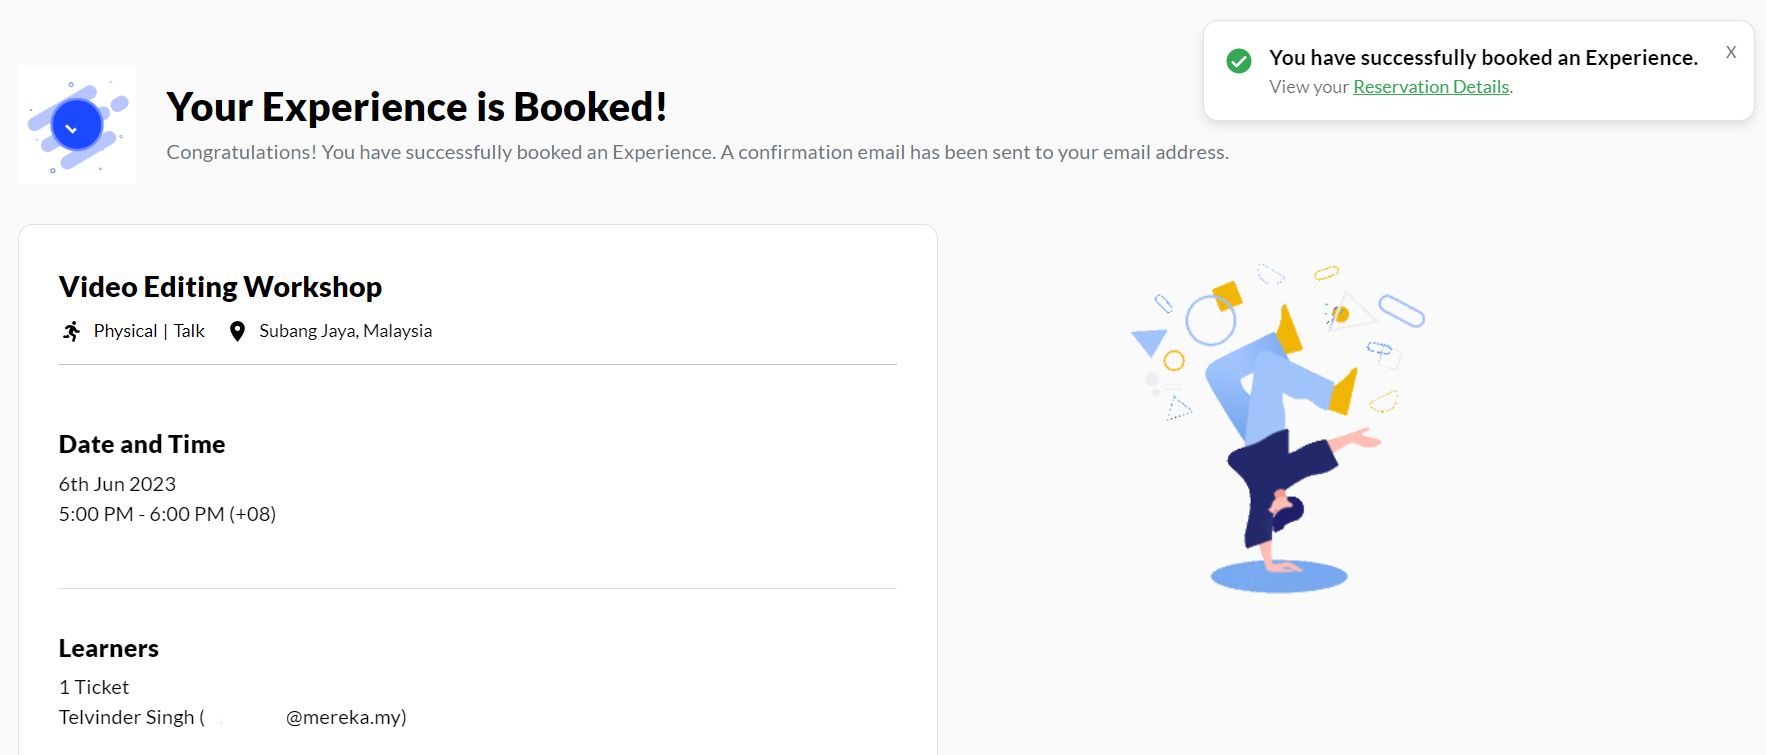
A huge benefit with this FPX and GrabPay addition is that when a Hub such as yourself would like to allow walk-in bookings, participants can now pay easily with them instead of needing to take out their credit/debit card which we know can be time consuming and disrupt the customer experience.
We are very much looking forward to you and your community getting your hands on this!
As usual, if you have any additional questions, please do not hesitate to reach out to us via team@mereka.io and if you would like to request any additional features for the platform, you may do so here.
Hey everyone!
We’re excited to announce the release of our long-awaited attendance recording feature. This new feature allows Hubs to easily check in participants for their Experiences directly on Mereka Connect, eliminating the need for external spreadsheets.
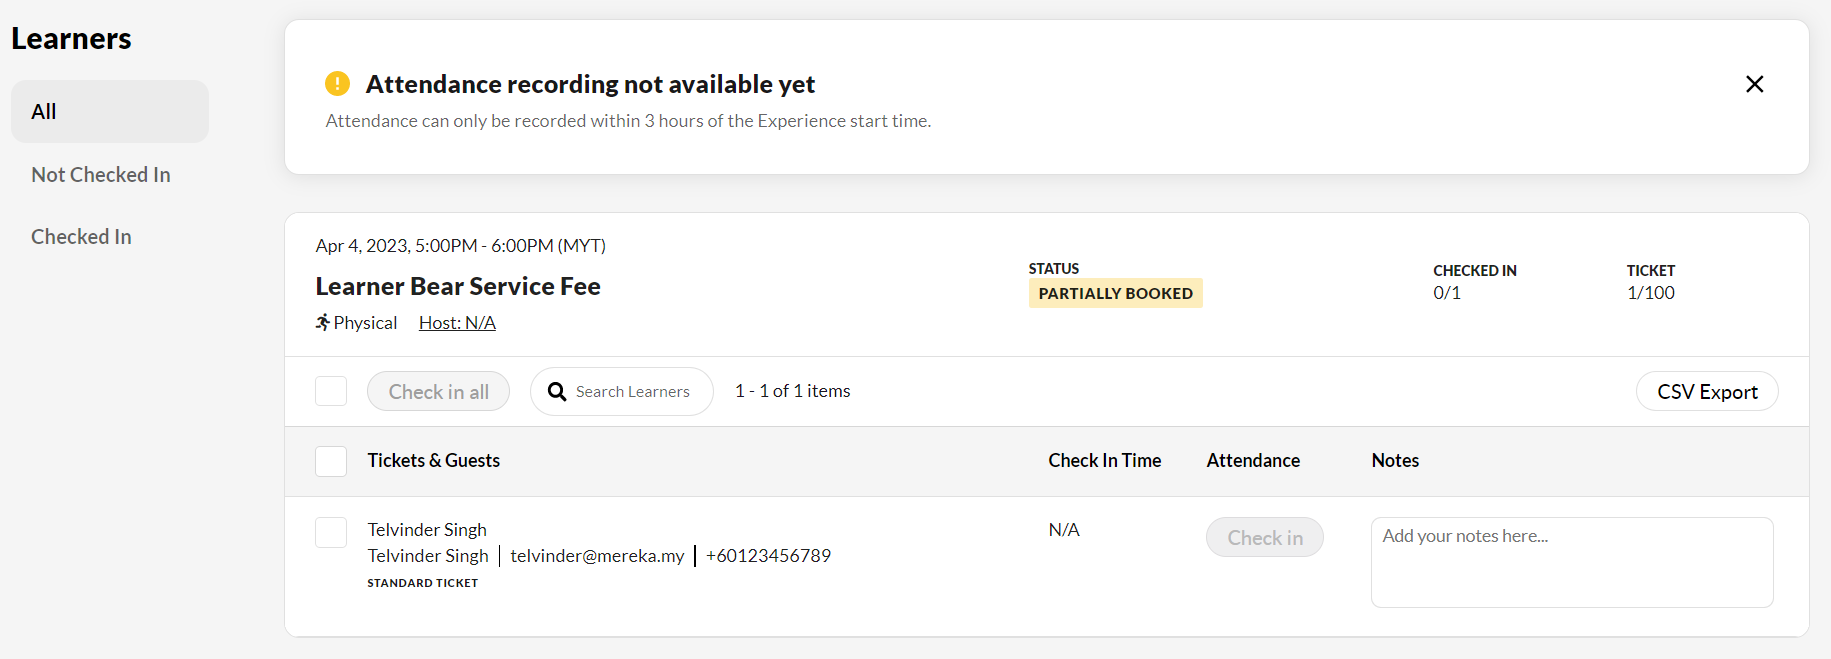
Please note that attendance can only be recorded within 3 hours of the Experience start time. If you try to access attendance before that time, a message reading “Attendance recording not available yet” will be displayed (refer to the image above).
To access the attendance page, you can use either of these two methods:
i
. If you have any upcoming Experiences for the month, scroll down on the Overview page and click the 3 dots below “Action” to open the dropdown menu. Then, click “Attendance”.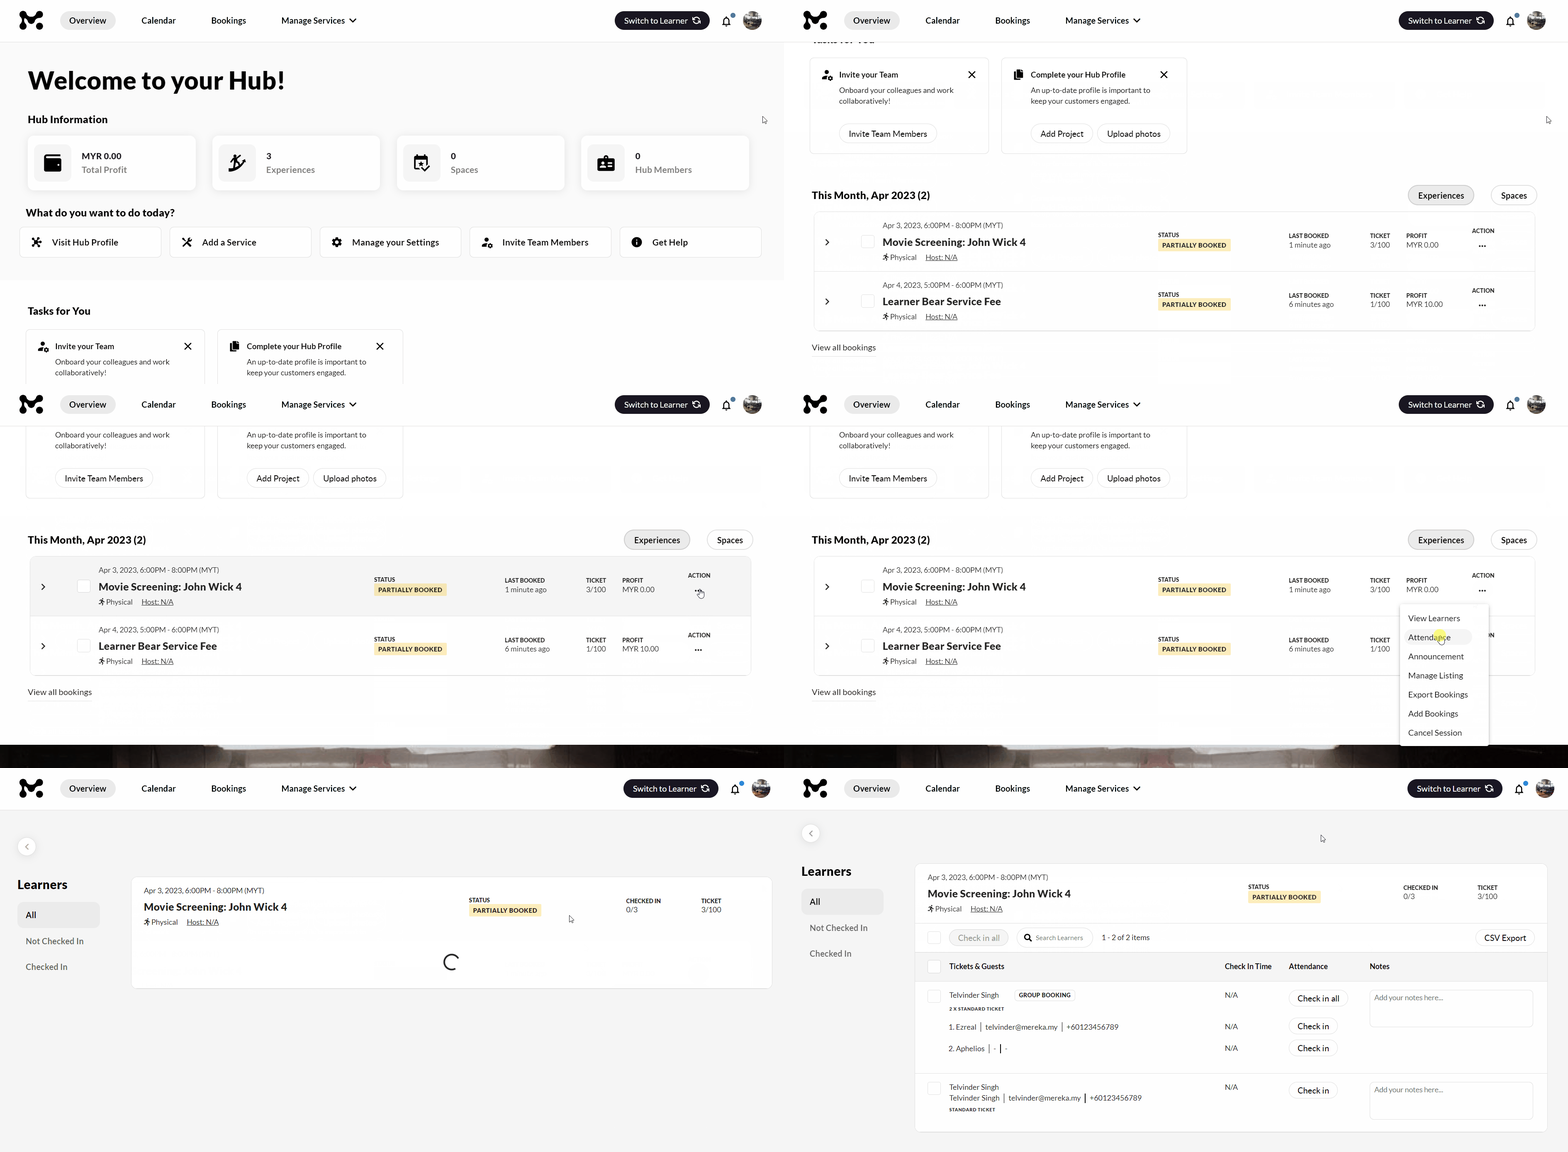
ii
. Or, click on the Bookings tab and head to the 3 dots below ‘Action’ to trigger the dropdown and click on the ‘Attendance’ button. In this Bookings page, you will be able to mark the attendance of Experiences that have passed as well.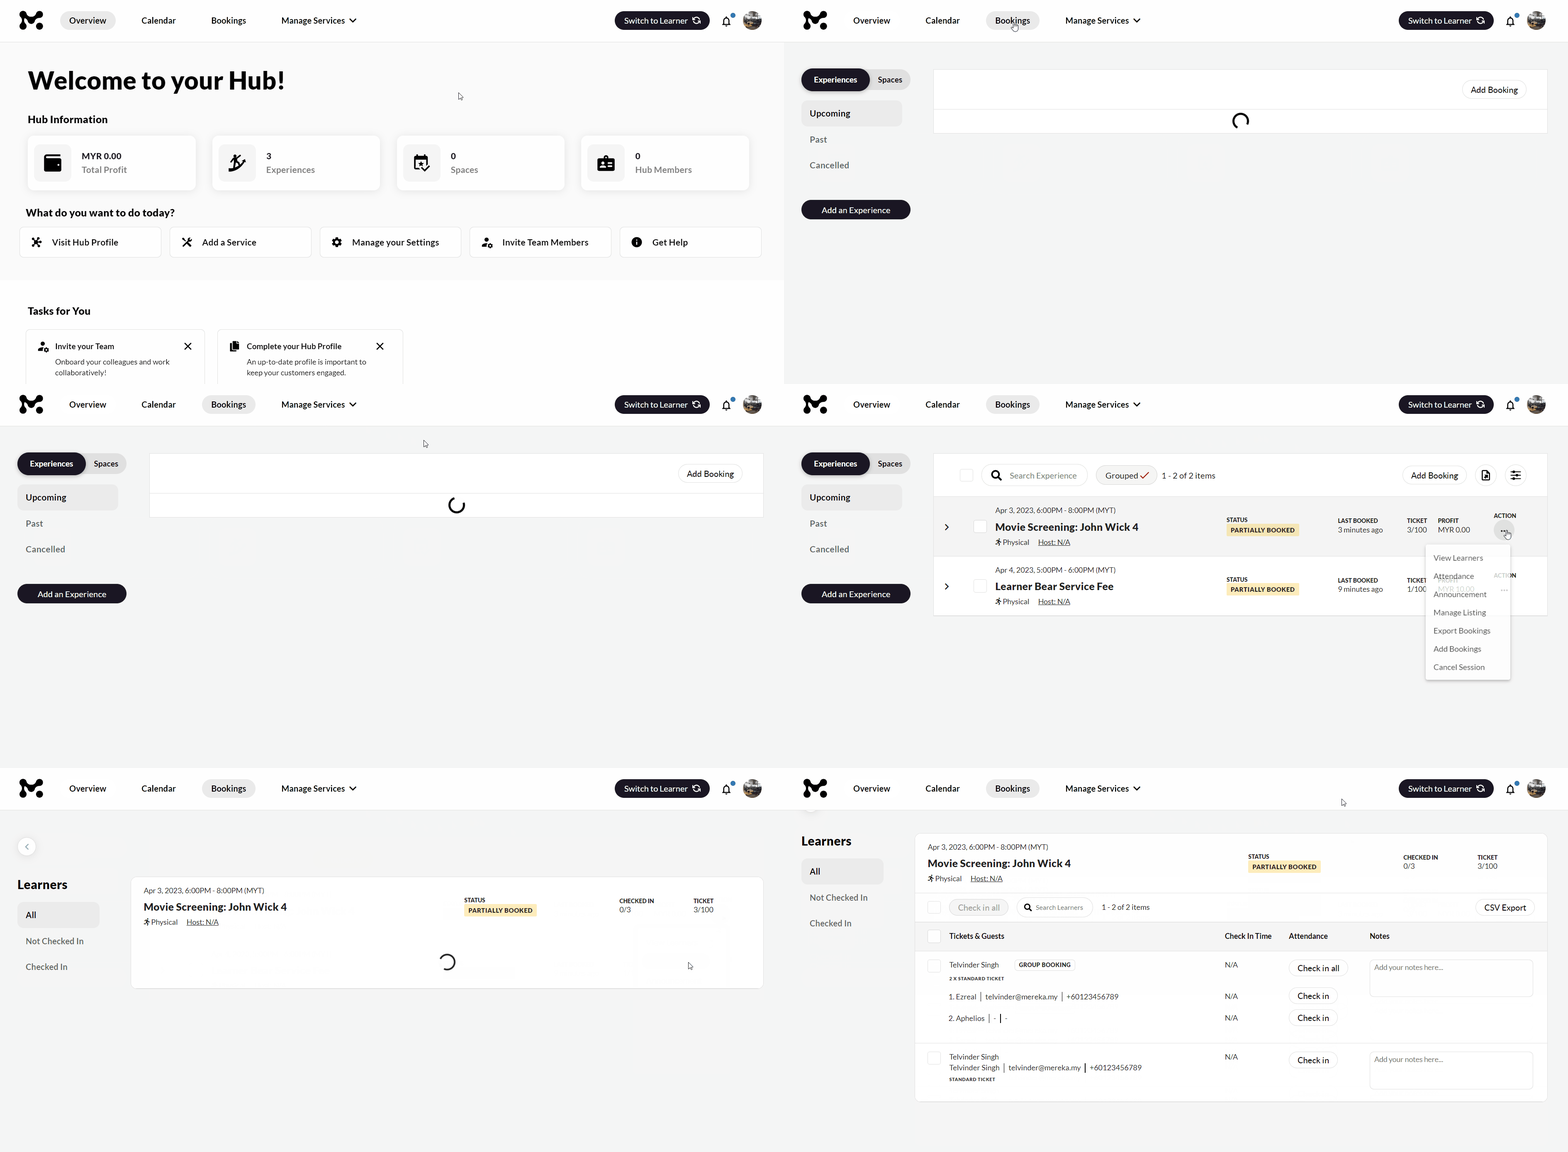
You can check in participants for group bookings by clicking ‘Check in all’, or for individual bookings by clicking ‘Check in’. You can also select multiple bookings using the checkboxes and click ‘Check in all’ at the top to do a mass check in.
To filter the attendance view, use the ‘Not Checked In’ and ‘Checked In’ tabs on the left-hand side. There is also a notes feature just in case you need to jot some things down!
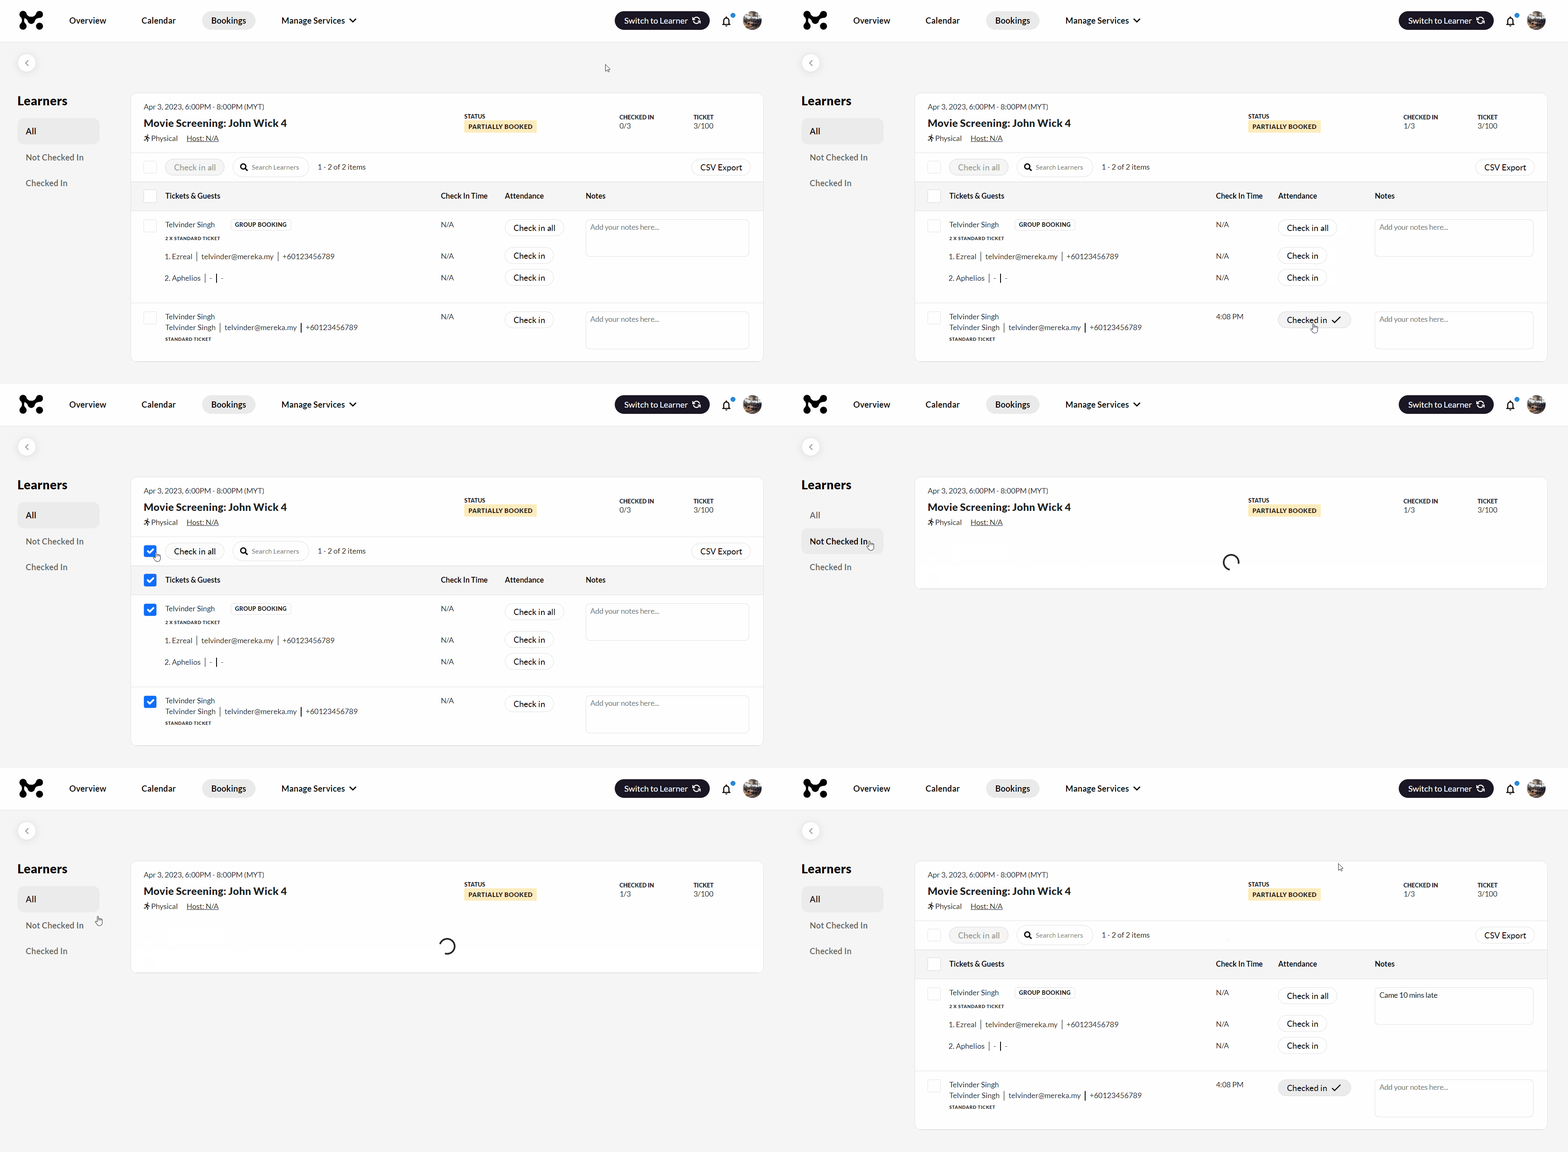
If you need to find a specific participant quickly, use the search bar to narrow down the list to matching results. If no matches are found, a message will be displayed.
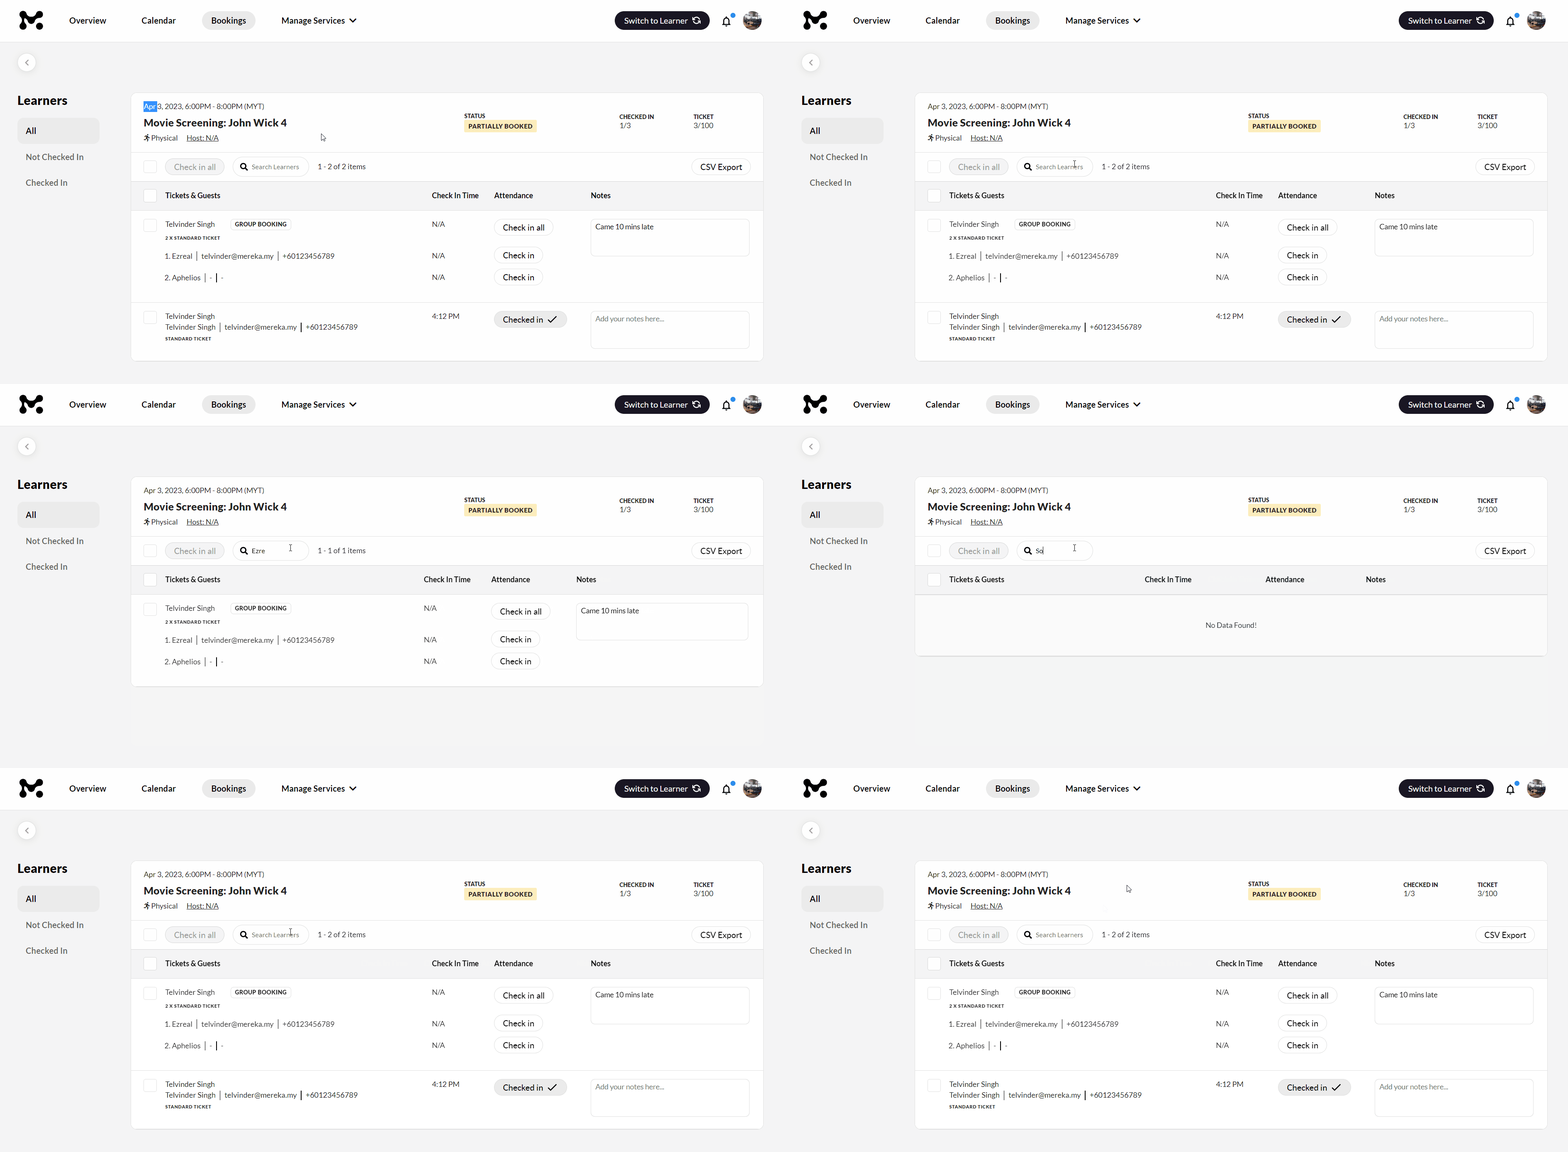
If you need to export the attendance list to a CSV, simply click the “CSV Export” button in the top right corner. You can also track the number of attendees who have checked in using the “CHECKED IN” and “TICKET” counters displayed at the top.

That’s everything you need to know about the attendance recording feature. We hope you find it useful and look forward to hearing your feedback!
improved
new
New Hub Profile
We’re very excited to showcase some amazing new features for your Hub Profile! These have all been highly requested by our Hubs and we’d like to take a moment to thank all of you who provide us with feedback and insights on how to serve you better.
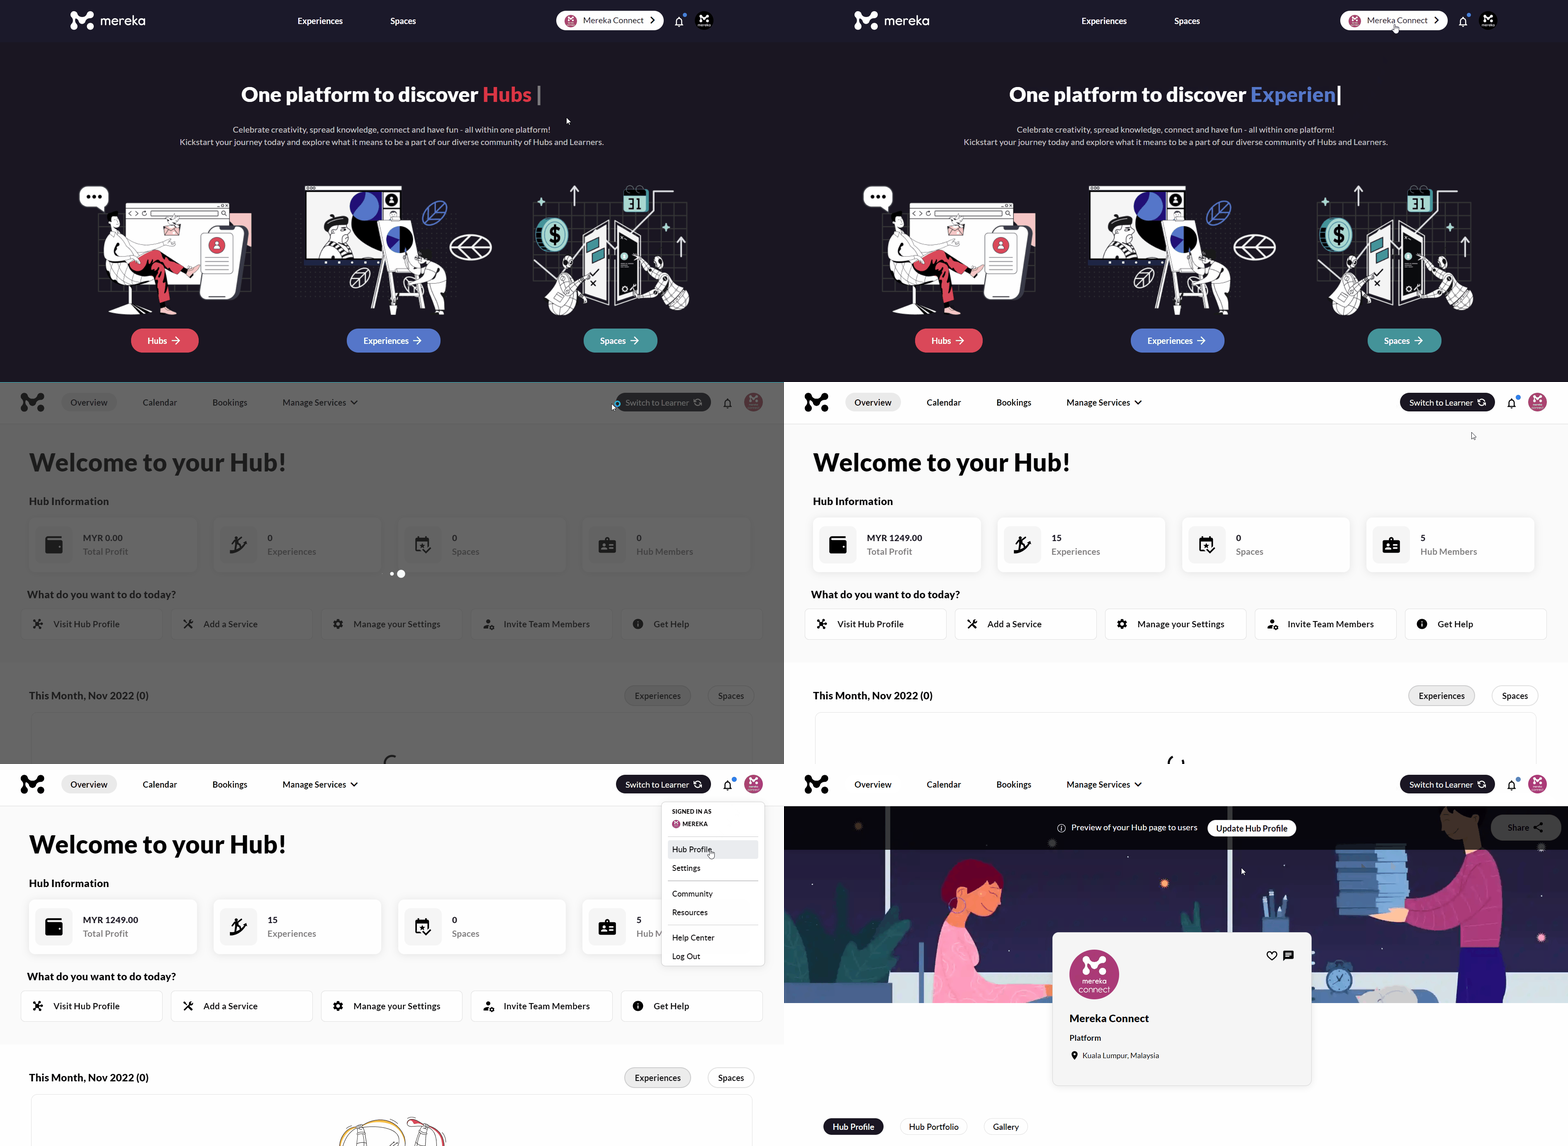
To view and utilize these features, please head to your Hub Profile by following the gif below.
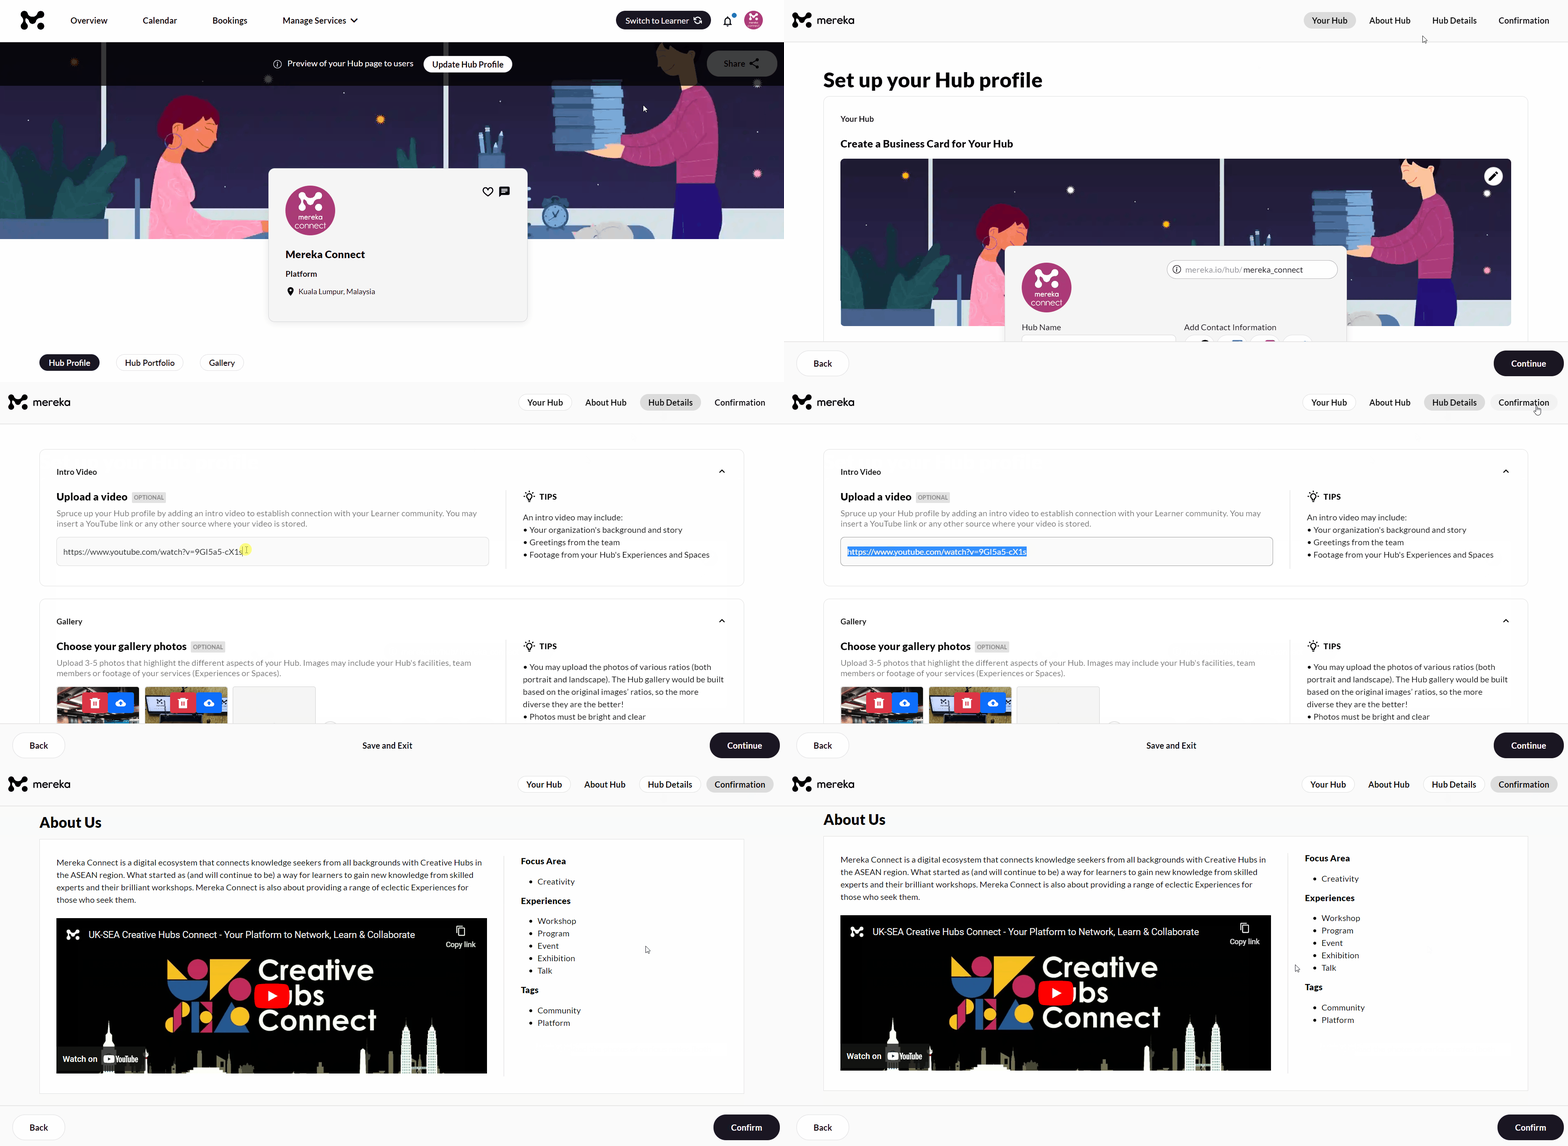
Customizable URL
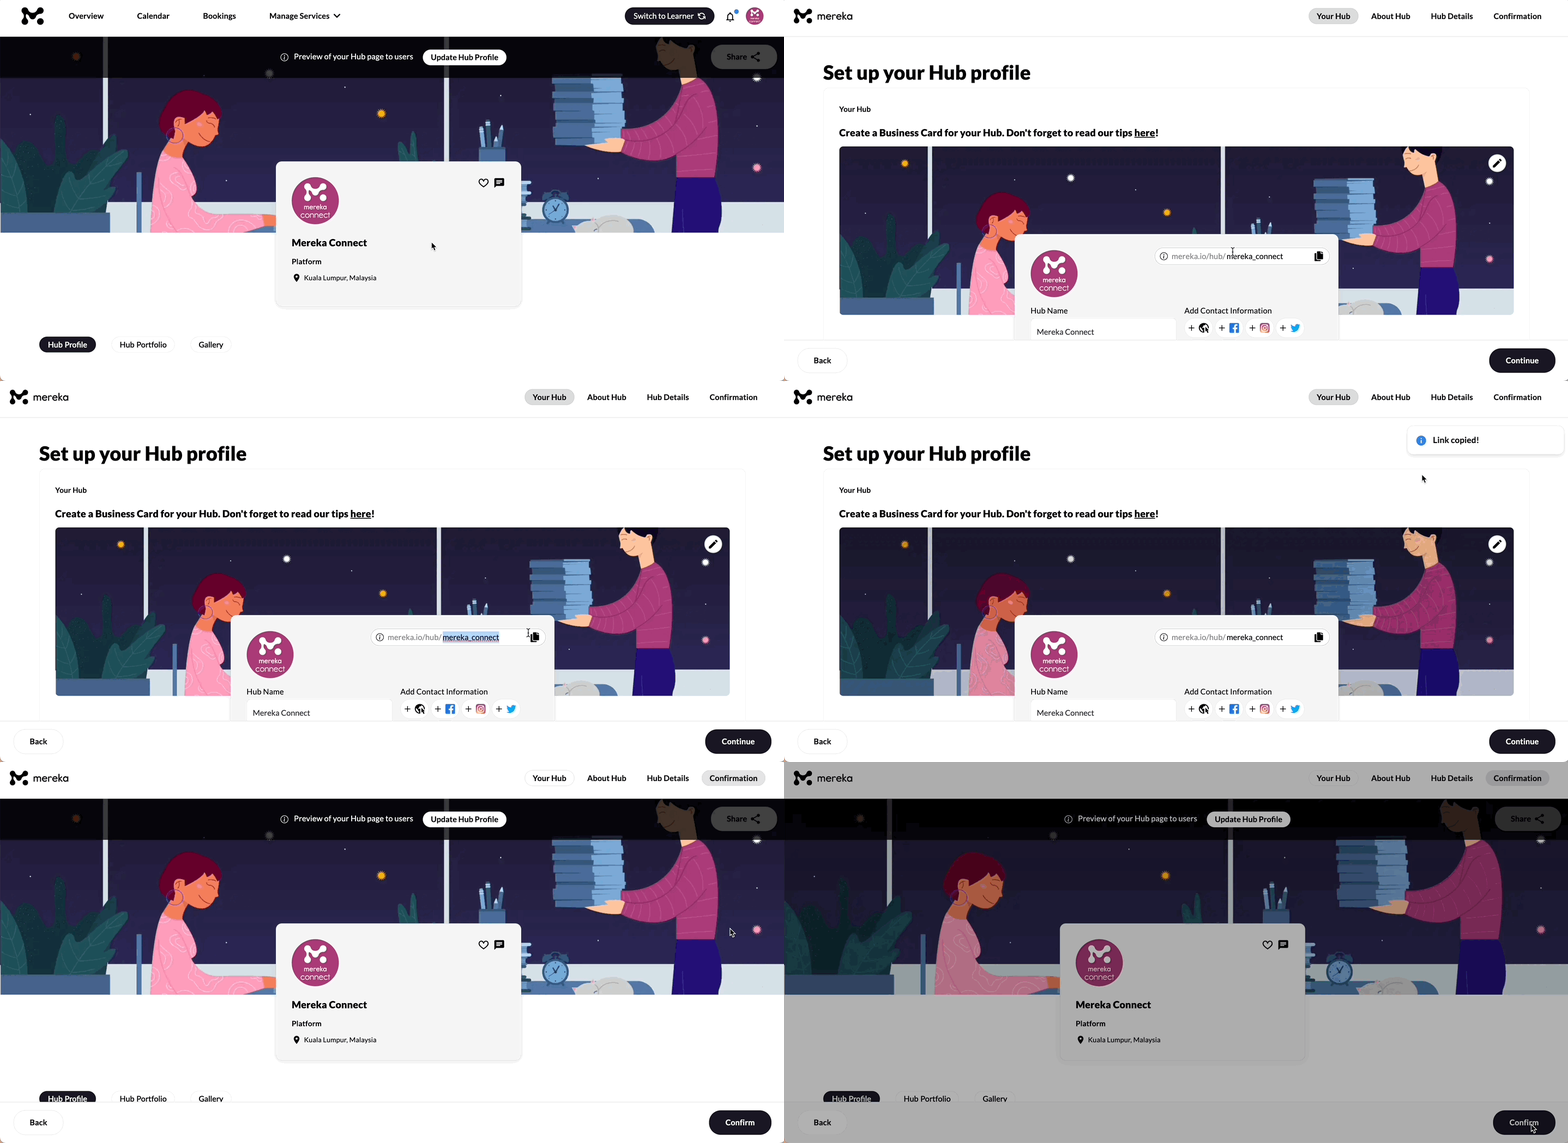
🔗Unique URLs can now be made for your Hub profile so that Learners recognize you at first sight from the link itself!
Setting up a customized URL is simple: press 'Update Hub Profile' and type your desired URL in the top right corner of your Business Card. Next, press the copy icon in the field to share the link after saving your new URL. Click the 'Confirmation' tab at the top of the page and then press 'Confirm' to save your changes!
Introduction Video
🎬You can now add an intro video, or any video about your Hub that you’re proud of. Spread your brand awareness!
You add it by going to ‘Hub Details’ when updating your profile, and inserting your video link into the ‘Intro Video’ field. This video will be shown together with your Hub Description in the ‘About Us’ section of your Hub Profile.
Gallery Photos
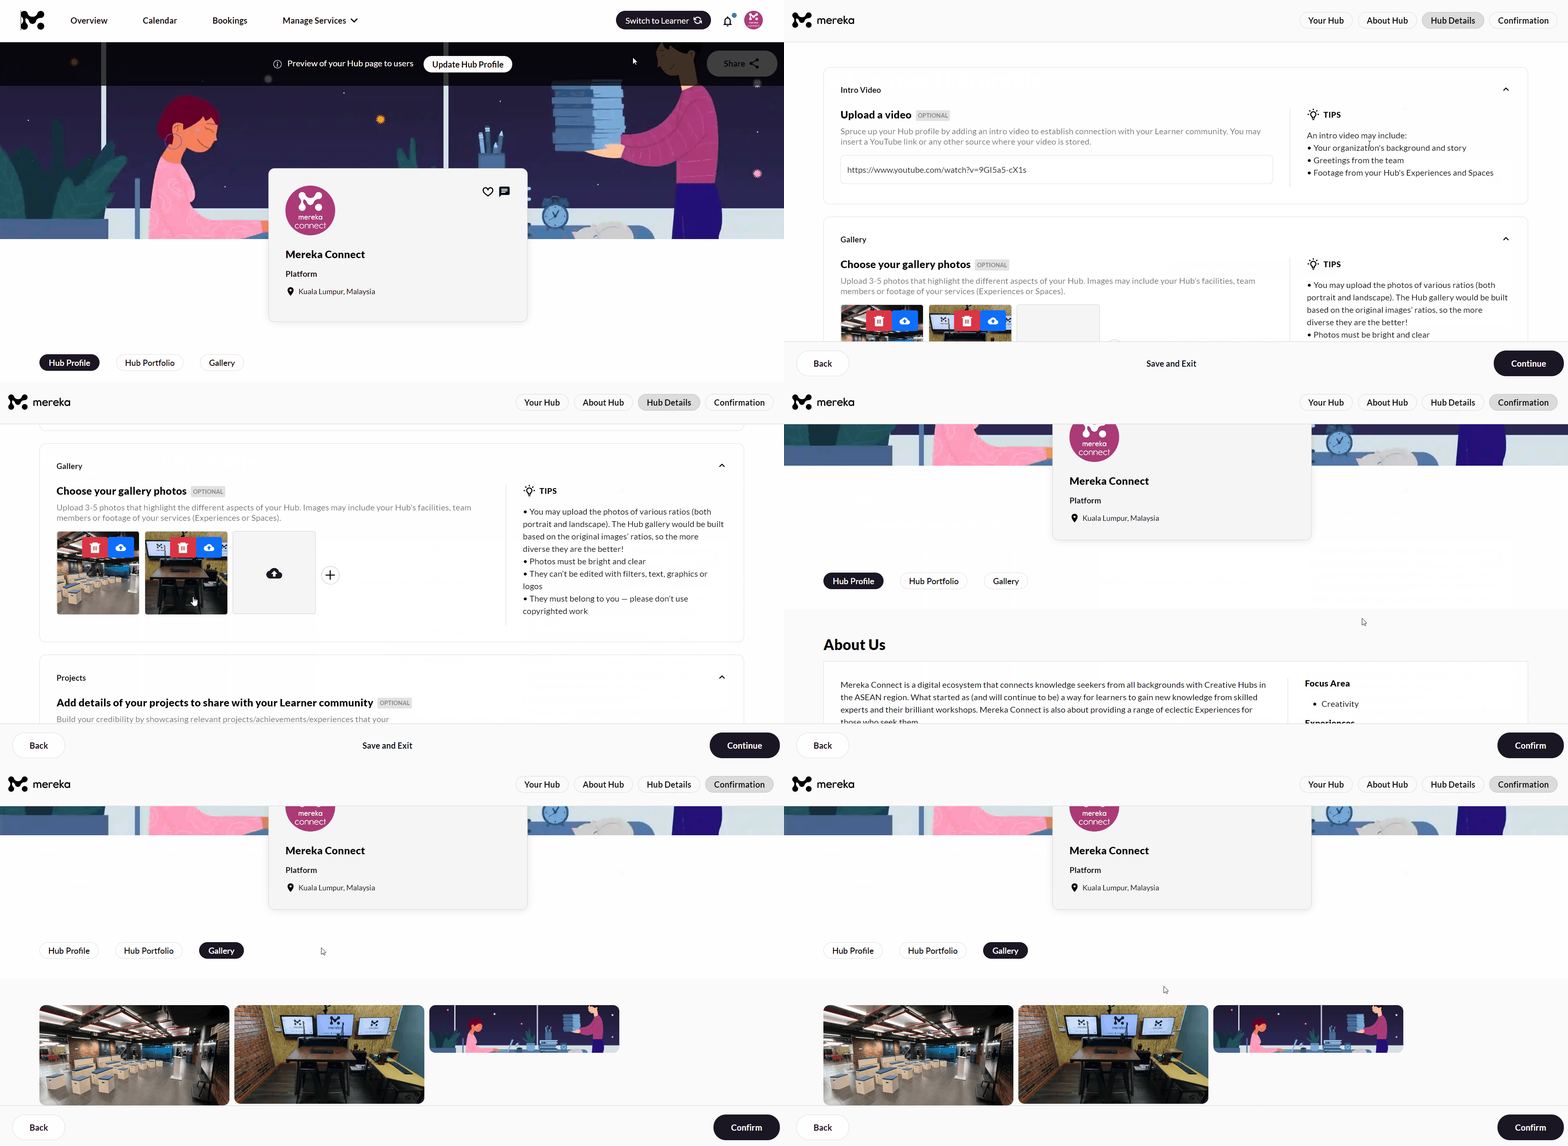
📸Have some rad Hub photos in your back pocket? Make your photographer feel appreciated and display them! These photos can show Learners how cool your Hub and its facilities are.
You can add 3 - 5 pictures through the ‘Hub Details’ tab when updating your profile. These pictures will then be shown in the ‘Gallery’ section of your Hub Profile.
Projects
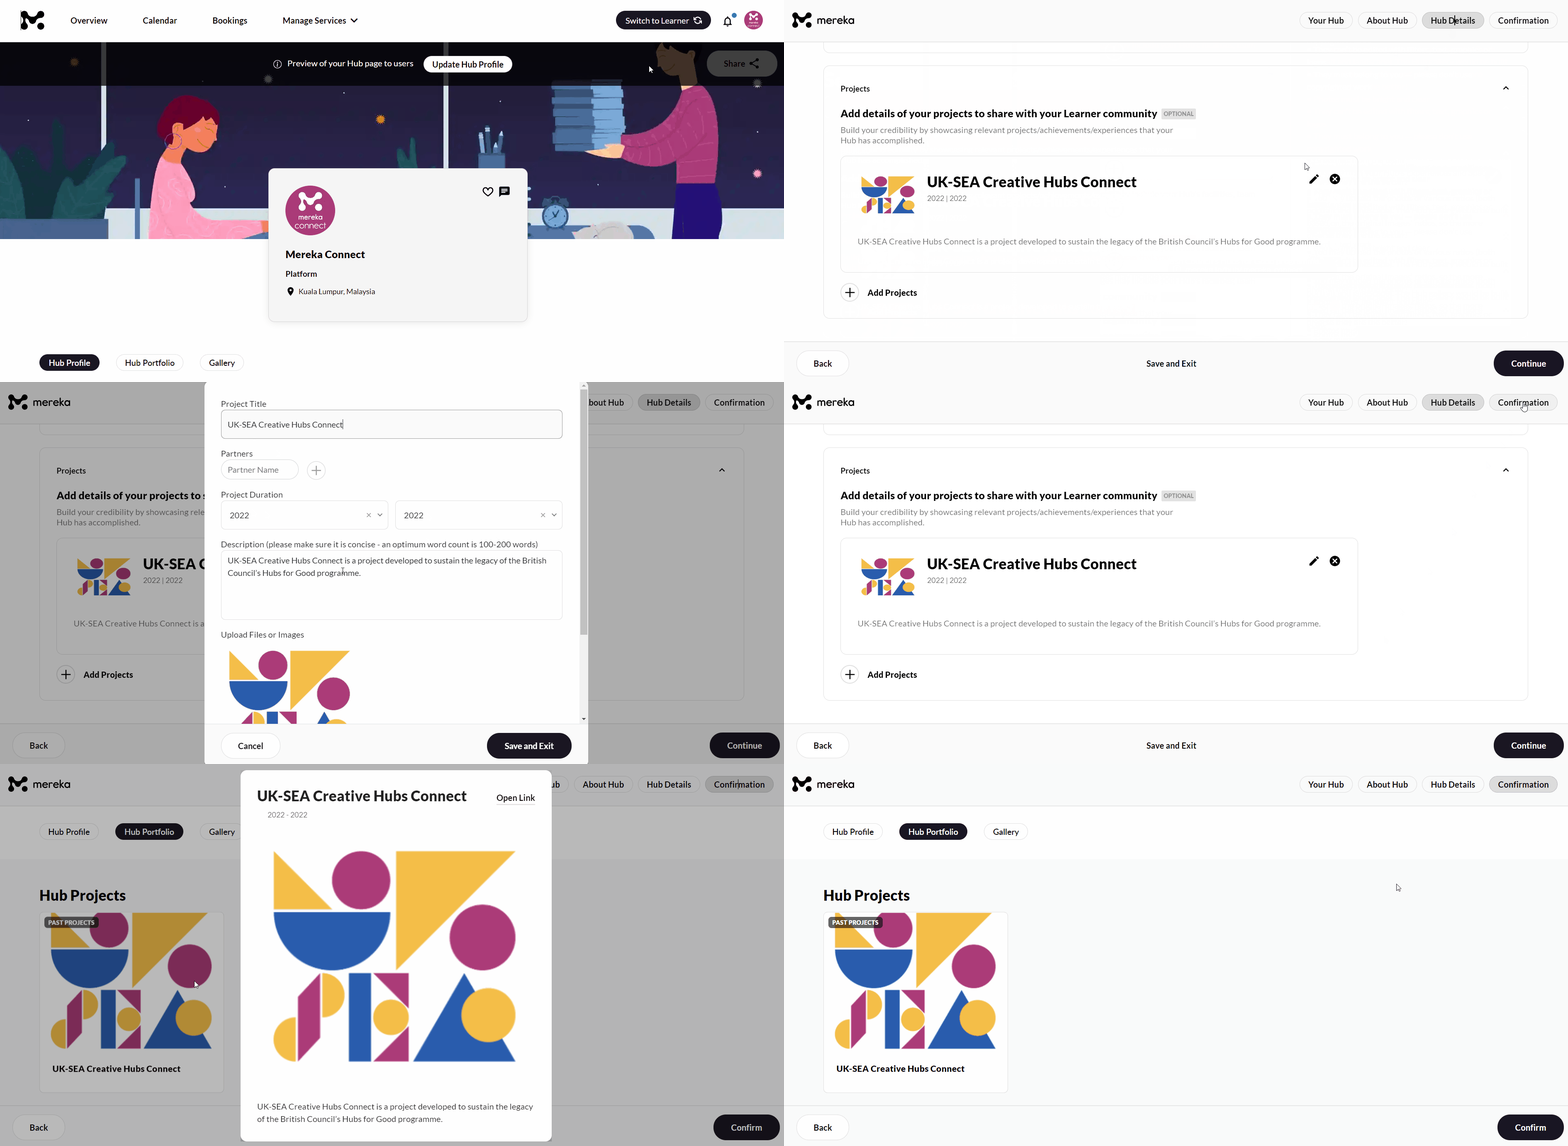
⚒️Show off your past projects and achievements! Let the world know what your Hub has been up to and present to your Learners the kinds of skills your Hub has refined.
You can display the project(s) you have worked on, the description of it, the time period of the project, relevant photos/files, and external links too! Head to ‘Hub Details’ when updating your profile and scroll down to ‘Projects’ to add them, you can add multiple of these by clicking the + button.
Once done, you can view your Projects in the ‘Hub Portfolio section of your Hub Profile.
Additional Treats
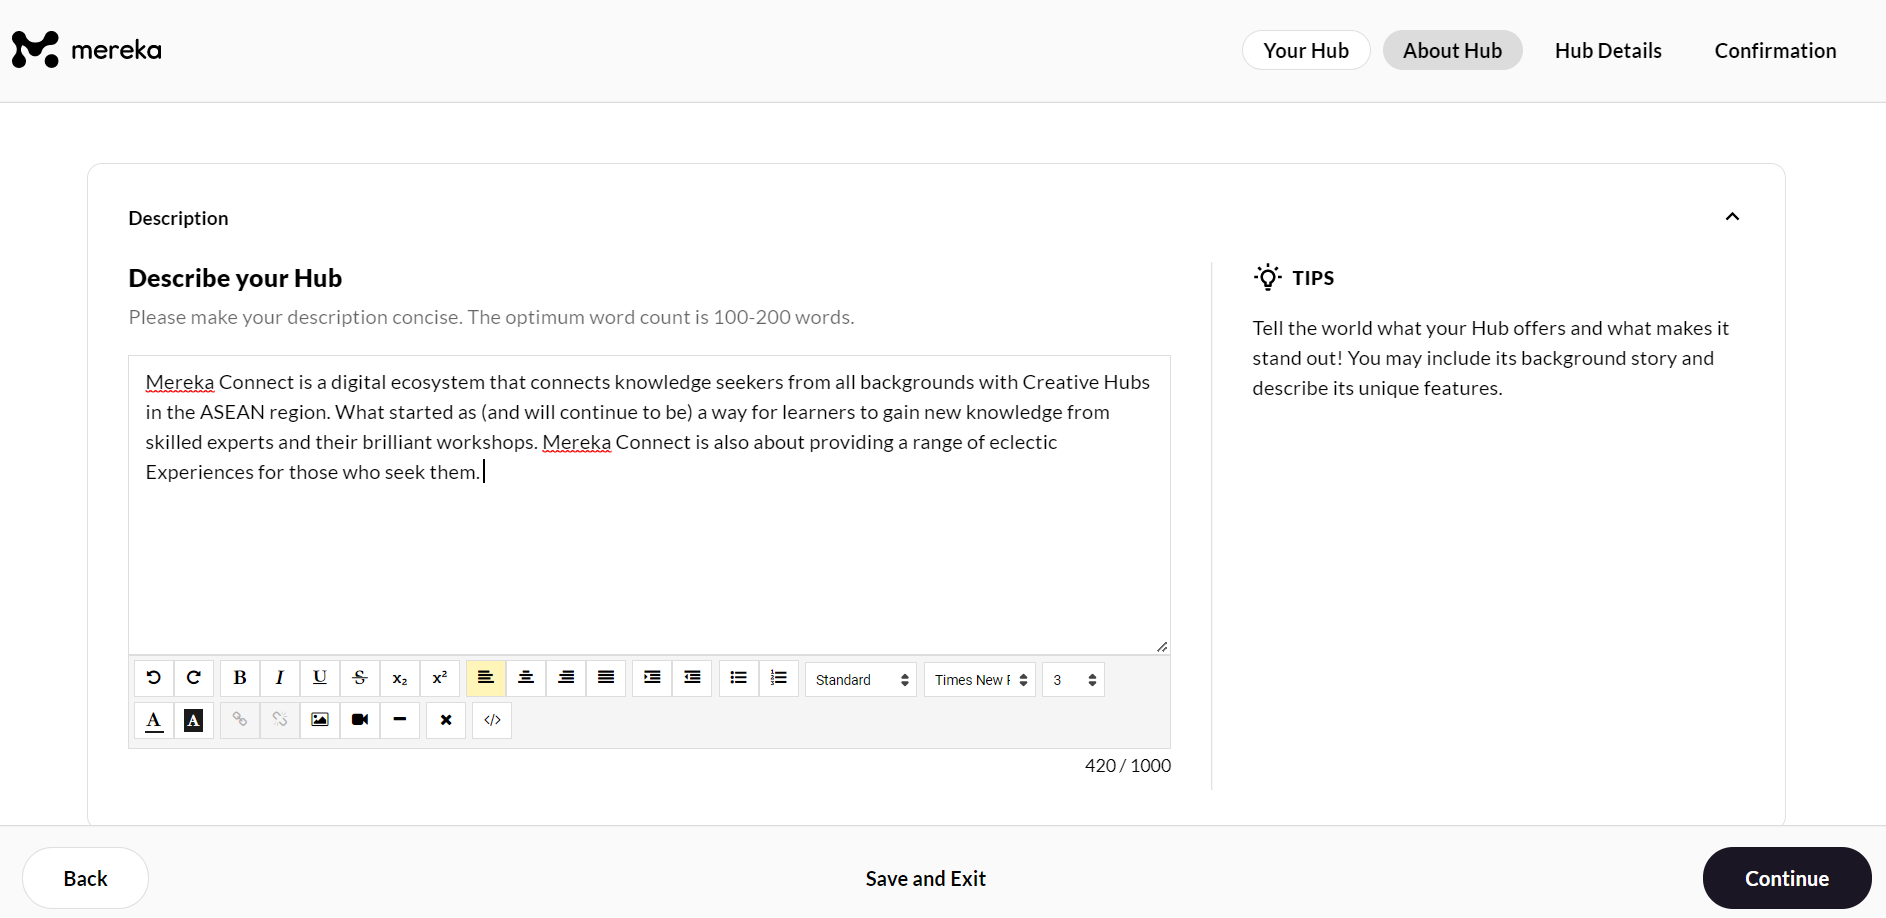
🍬Your Hub description now has a rich text field, which means you can bold/italicize/underline/strikethrough your descriptions, change font color and size, and more! This gives you further customization options and increases your freedom of expression!
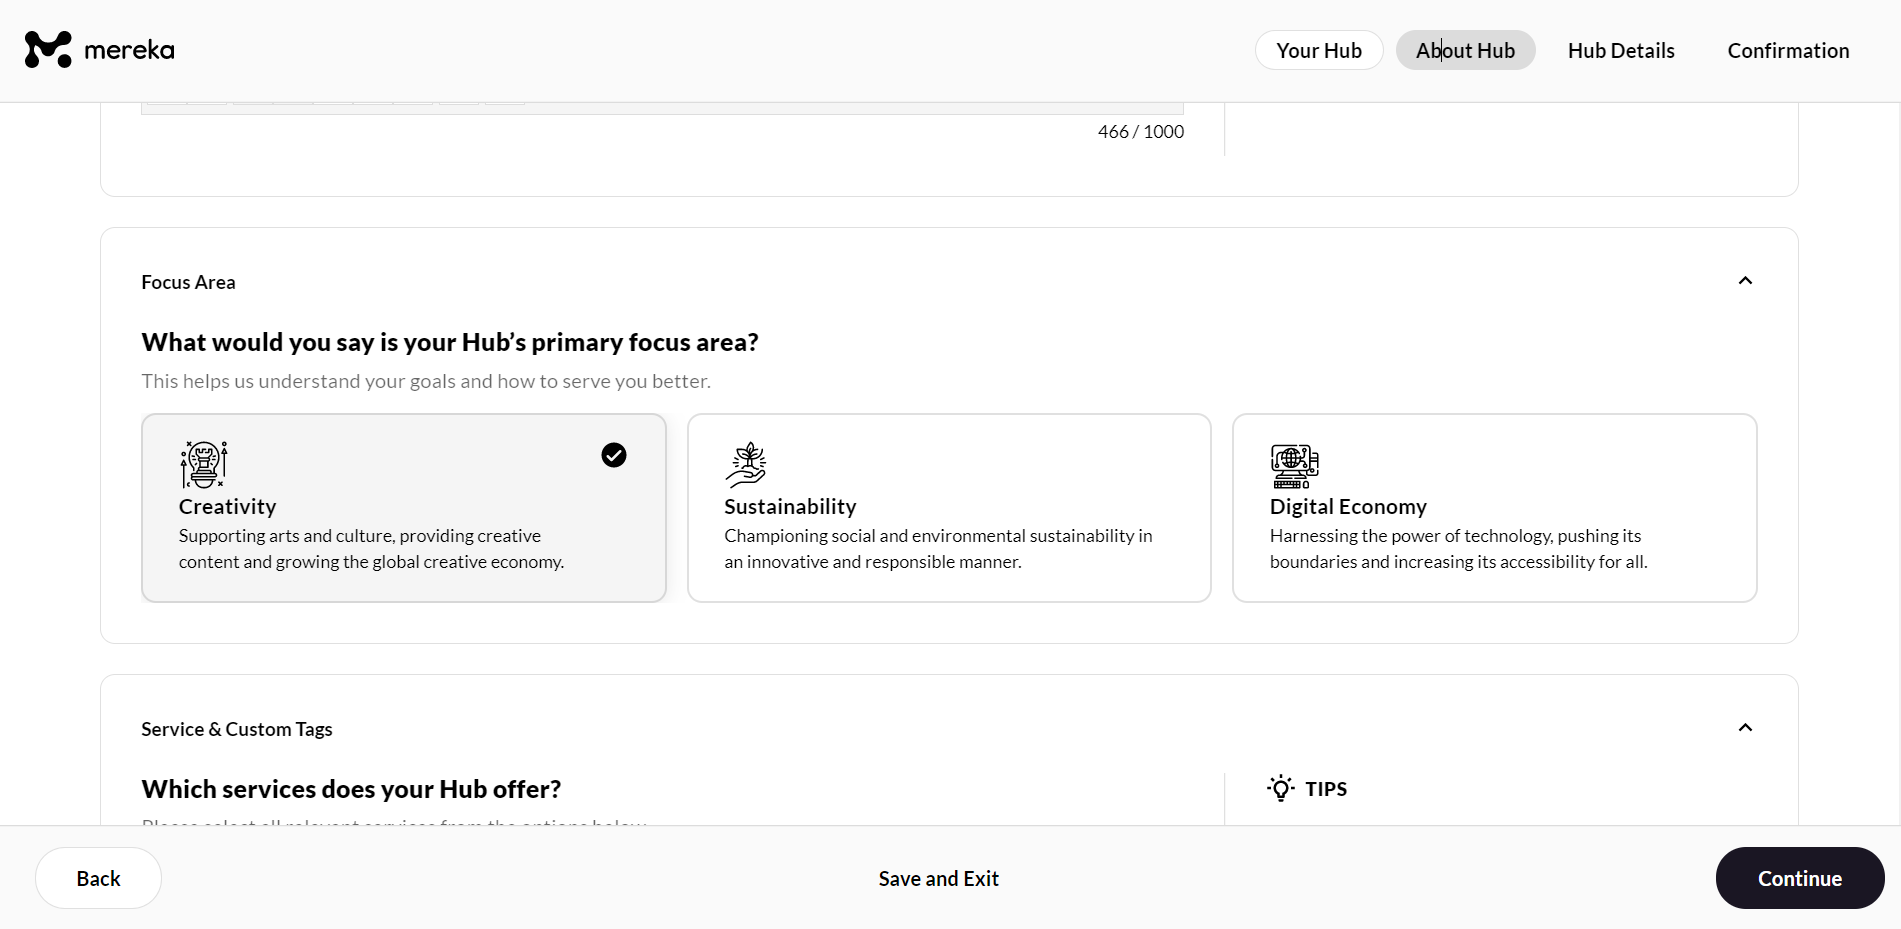
You also can now select a Focus Area for your Hub. This helps us and your Learners understand your goals and ambitions as an organization. Currently there are three available options, which are Creativity, Sustainability, and Digital Economy.
We hope you’re as happy with the changes as we are, and we’re looking forward to seeing your breathtaking pictures and videos! If you have yet to create a Hub on Mereka Connect, you can check out this article. In the event you have any additional questions, please do not hesitate to reach out to us via team@mereka.io.
RBAC simply means Role-Based Access Control and defines a user's access to certain features based on their assigned roles. Which means, you can now give the team members of your Hub different permissions aligned with their actual roles within your organization!
Below are the roles currently available on Mereka Connect:
👑
Hub Owner
- one owner to rule them all. This is the user who created the Hub, and they're the one and only.👨💻
Admin
- a user who helps the Hub Owner manage their Hub. They have the same access as the Hub Owner does, except for deleting the Hub.🕵️
Expert
- a user whose main permissions are managing services and bookings. Experts have limited access to the Hub dashboard (e.g. can’t access Hub finances and settings).👫
Collaborator
- an external user (not a team member, unlike the roles above) who is involved in managing a particular service. Collaborators can only have access to the services they have been assigned to, and do not have access to the rest of the Hub dashboard.A standalone sub-role which can be created either out of an existing team member or an external user is a
Host
. Hosts can be added to a particular service. It is also possible to add Hosts from other Hubs or add new users who are not registered on the platform yet.Features that can be used with this RBAC update:
📩
Inviting team members to join your Hub
Inviting team members into your Hub is a breeze! Just click the “
Invite Team Members
” button in your Settings, and add them by typing their email address or name. You will also be able to select their roles here! Psst, you can upload a CSV file if you want to invite them in bulk ;)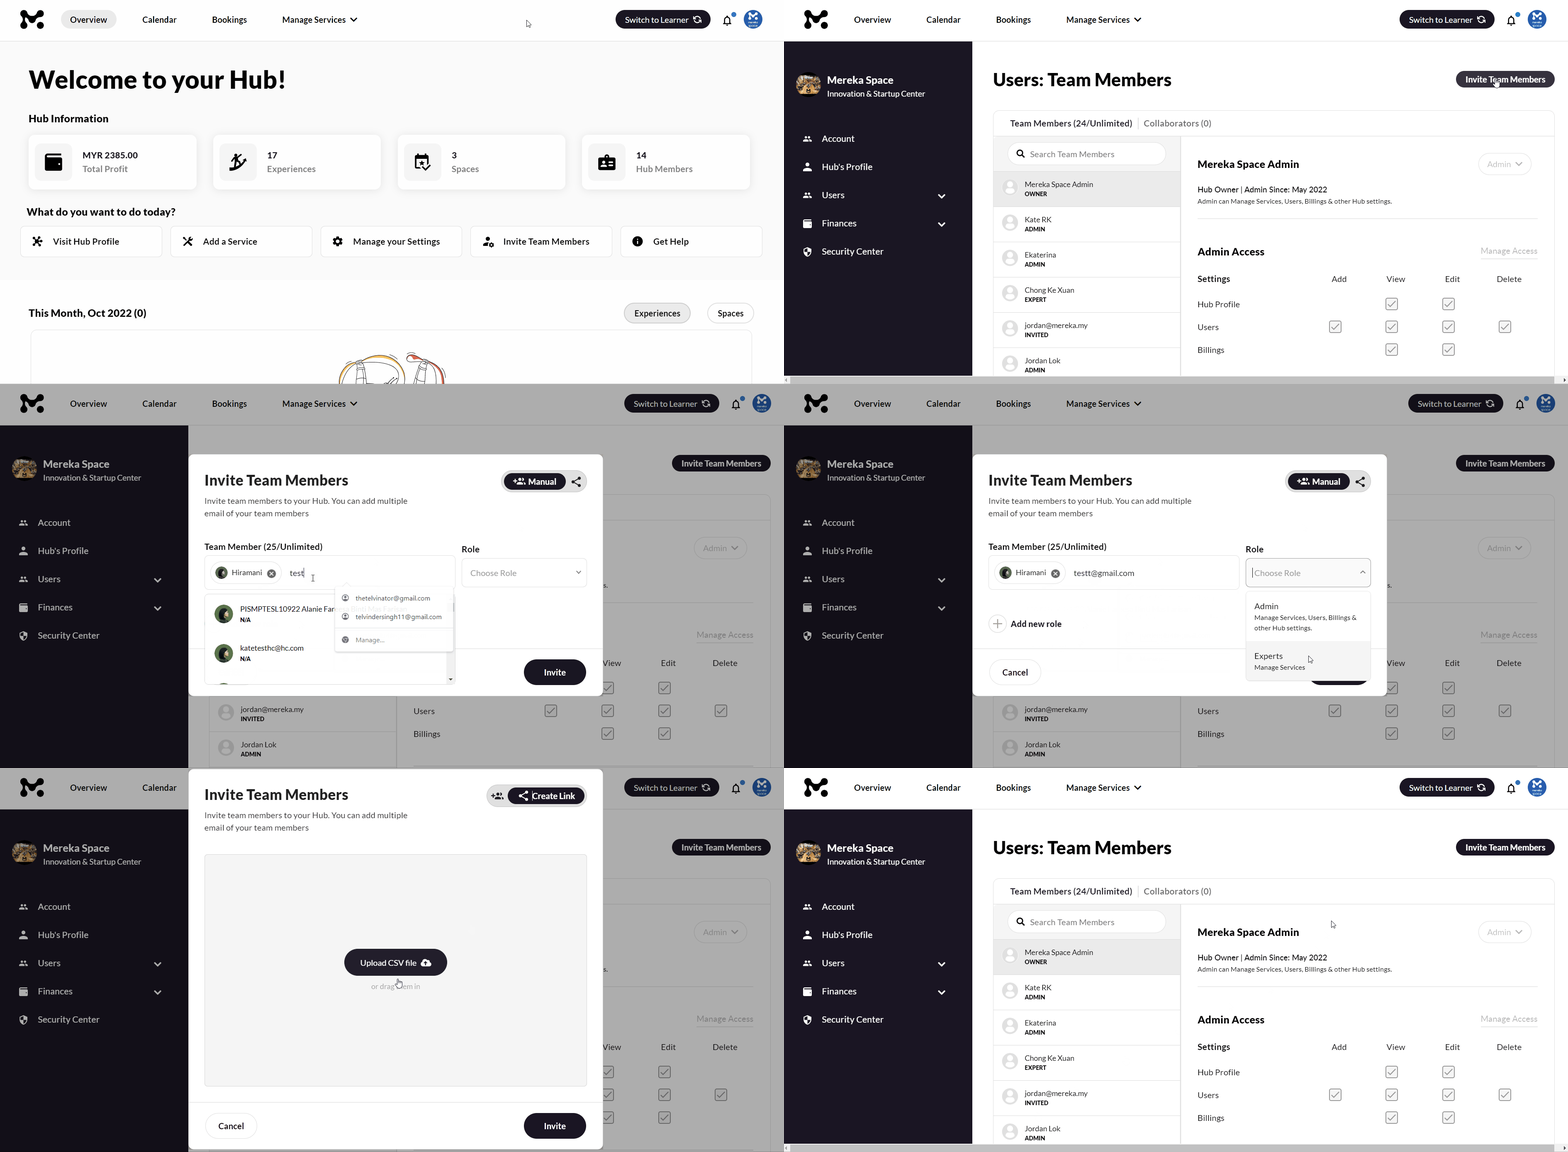
⬆️
Updated Host adding interface
We have updated the user interface for adding a Host in the Experience form. You can now add
users from other Hubs
, in addition to Hub Experts
and users who aren’t registered on Mereka Connect
. And that's not it - you can also assign access levels to these Hosts, ranging from “Full Access” to “View Only”.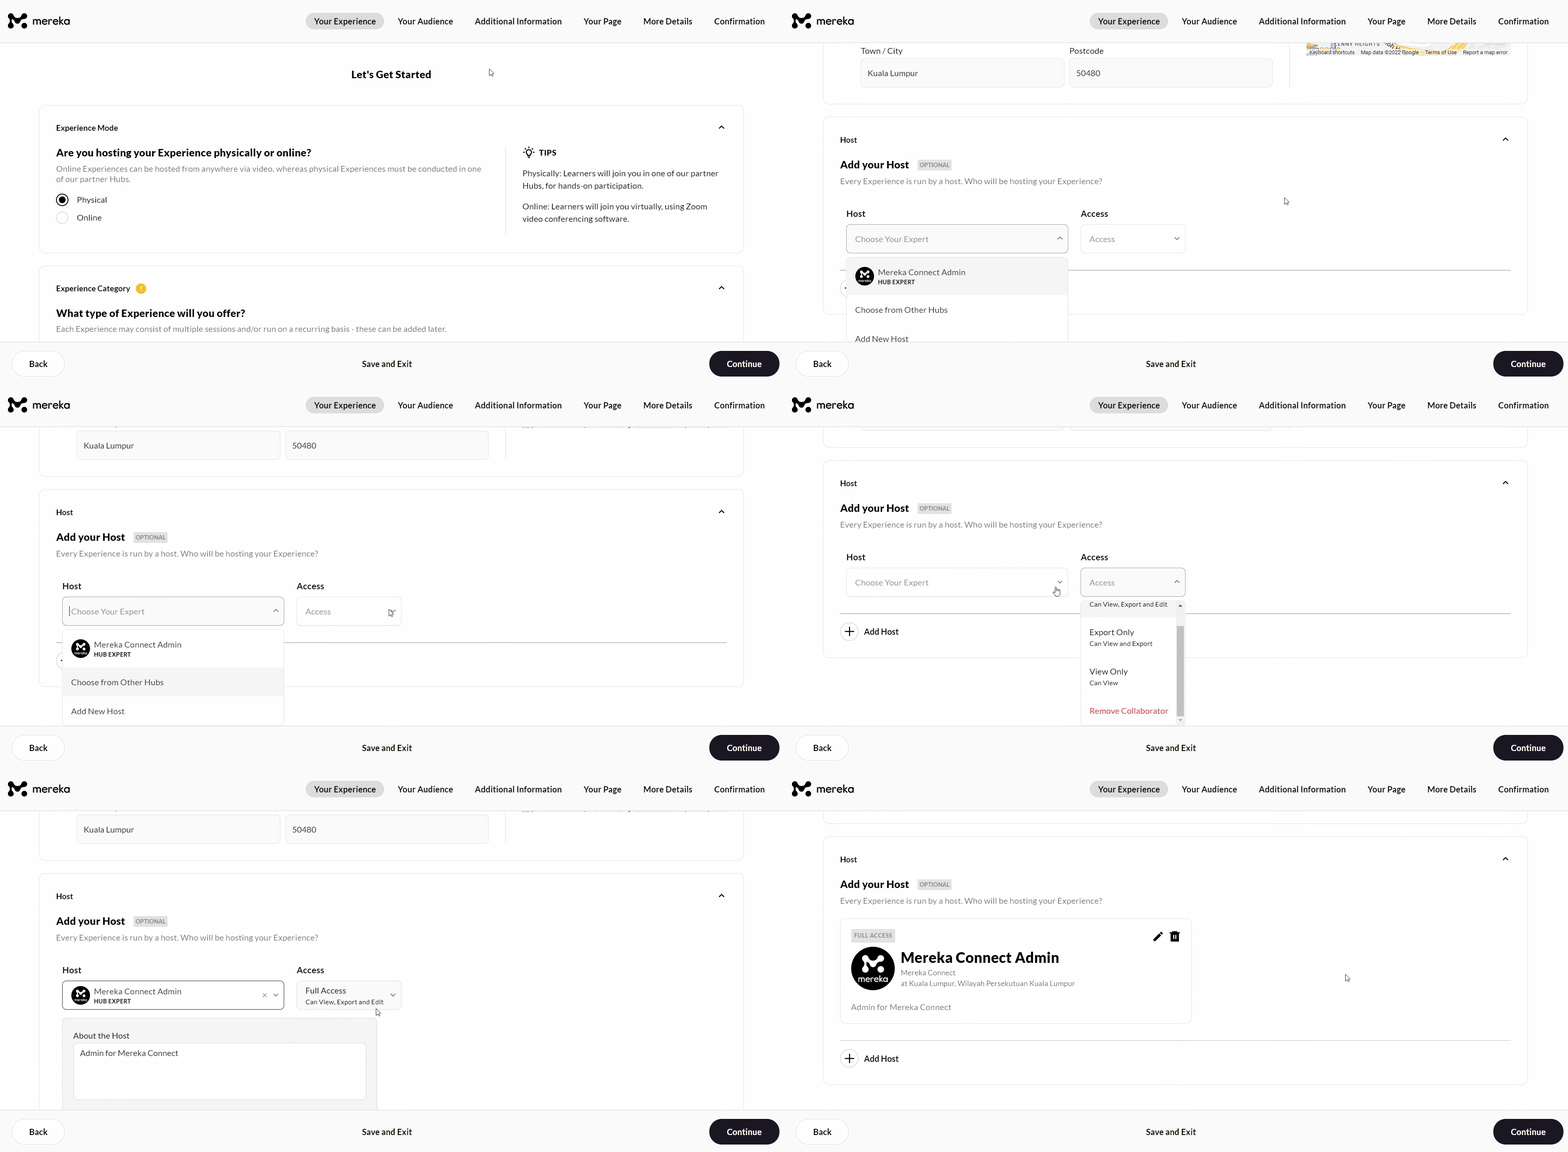
🖥️
Customizing your team members' permissions
You can review your team members’ permissions according to the role assigned to them. If your Hub is on a paid subscription plan, it is possible to
customize permissions
for each individual user by clicking "Manage Access". This option is disabled for our free Connect plan. It is also possible to switch a team member's role
by clicking the dropdown menu with the current role - the same menu allows you to remove team members
if they are no longer a part of your Hub.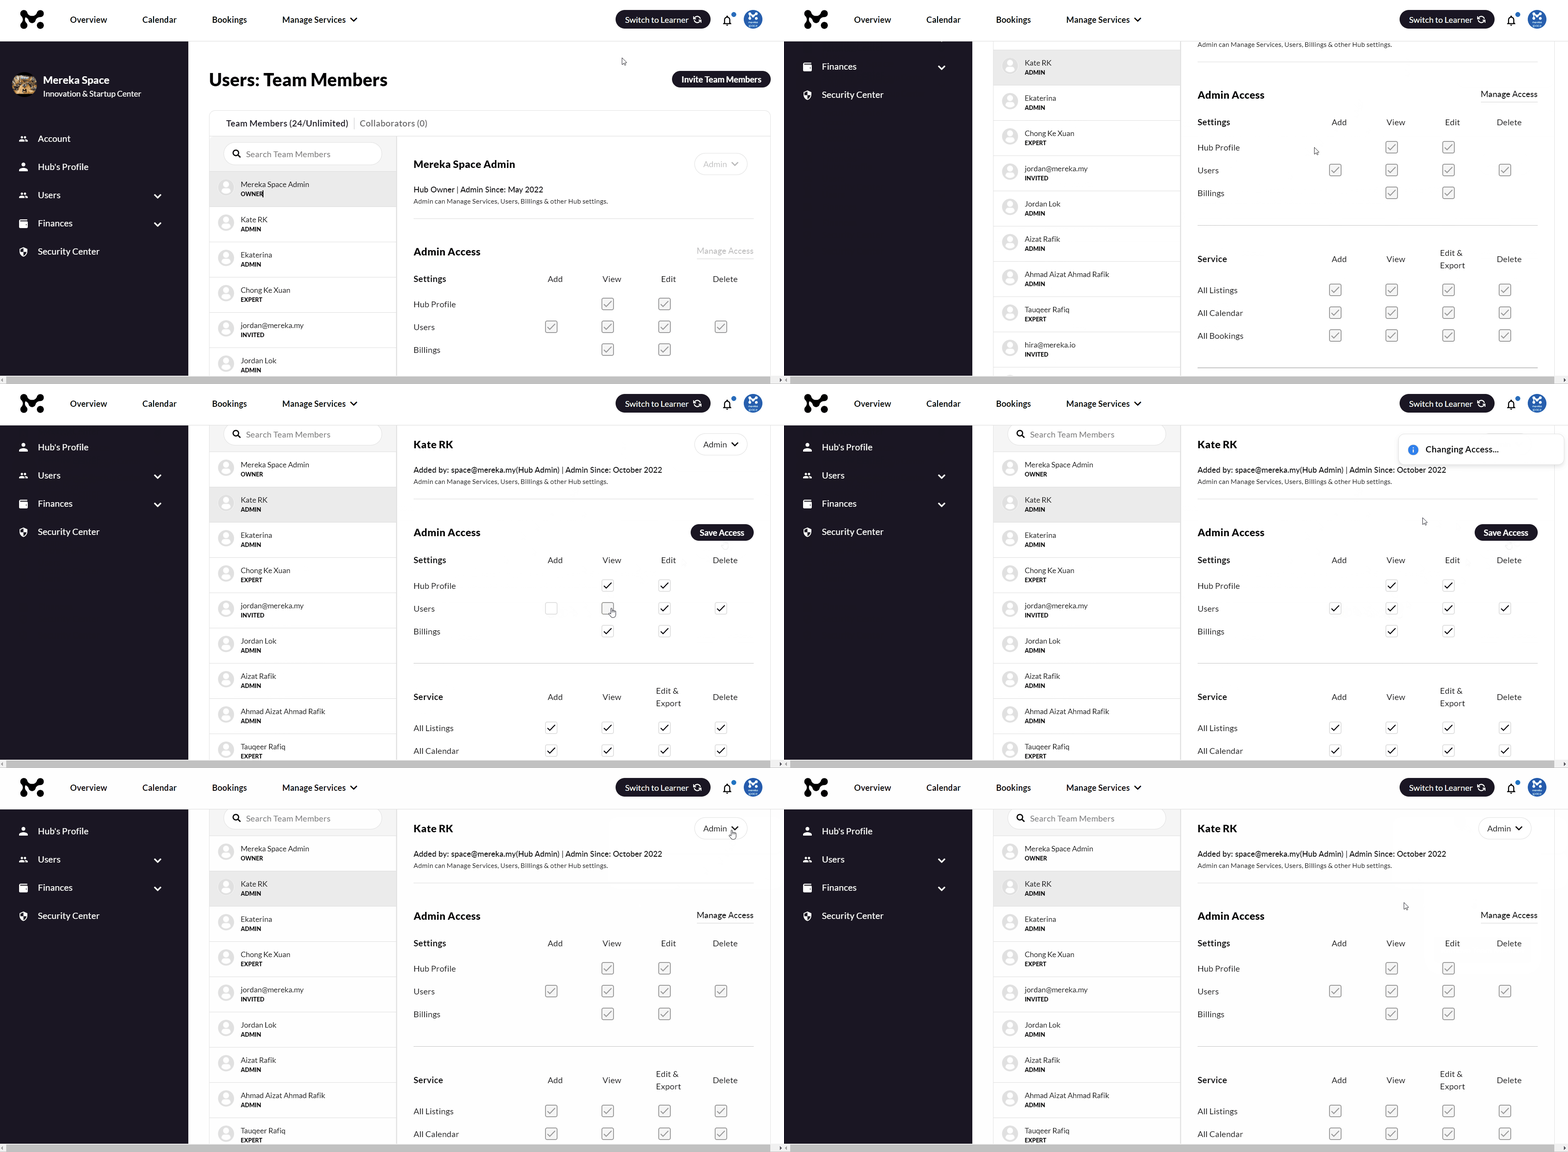
Visit our Help Center to learn more about managing various roles and adding Hosts and Collaborators to a particular Experience. If you have any additional questions regarding the user management on Mereka Connect, do not hesitate to reach out to us via team@mereka.io.